Mango Chicken Salad with Blue Cheese Vinaigrette

Mango Chicken Salad with Blue Cheese Vinaigrette

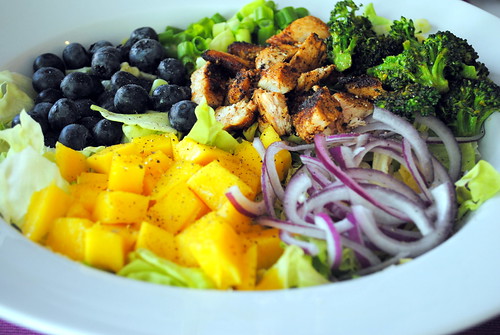
This salad has it all; sweet, salty, cheesy, and all delicious. Mango, blue cheese and broccoli are some of my favorite foods, but never in a million years would I think of combining them. Ever. But somehow, it totally works. The flavor combinations definitely make for a very unique meal.

I definitely plan on making this salad again, but next time I think I might add a couple of other things to make it even better. Adding some toasted cashews or almonds would add a great crunch to the salad. I could also imagine substituting the chicken for shrimp (maybe even coconut shrimp for more of a tropical twist).

Mango Chicken Salad with Blue Cheese Vinaigrette

Mango Chicken Salad with Blue Cheese Vinaigrette
Inspired by Better Homes & Gardens.

For the Vinaigrette:

  • 1/3 cup white-wine vinegar
  • 1 tablespoon Dijon mustard
  • 2 cloves garlic, minced
  • 1/2 cup extra-virgin olive oil
  • 1/2 cup crumbled blue cheese
  • Salt and freshly ground pepper, to taste

For the Salad:

  • 6 cups torn romaine lettuce
  • 2 cups fresh blueberries
  • 1 mango, pitted, peeled, and cut up
  • 12 ounces chicken breast
  • Salt and ground black pepper, to taste
  • 2 Tablespoons unsalted butter or olive oil
  • 3 garlic cloves, minced
  • 2 cups broccoli florets

For the Vinaigrette:

  1. Combine all ingredients in a bowl and whisk together. Season to taste and set aside.

For the Salad:

  1. On a serving platter place romaine lettuce. Top with blueberries and mango; set aside.
  2. Season chicken breast with salt and pepper. In a large skillet cook chicken in 1 tablespoon of the butter with minced garlic over medium heat for 6 to 8 minutes or until no longer pink, turning once. Transfer to a cutting board; slice. Allow to cool slight and arrange atop salad.
  3. In the same skillet cook broccoli in the remaining tablespoon garlic butter over medium heat for 4 to 6 minutes until tender. Place atop salad.
  4. Drizzle salad with blue cheese vinaigrette. If desired, sprinkle with blue cheese.

Fromage Fort

Hi Fromage Fort, I'm your newest fan. #cheeseoverload

I doesn’t look like much, but I cannot even begin to put into words how amazing this is. Amazing! That’s all I can say. I was faced with the awkward situation of having a whole bunch of cheese, but not enough to make a legitimate cheese plate. You know that awkward spot where you’ve had a wine and cheese night and there is some cheese leftover, but not really anything worthwhile. It’s always a dark day. There are just tiny bits of that, something with a bit of a rind, some soft stuff that was kind of sad looking, a tad of blue begging to find a second chance. I poked around the internet for a bit and thanks to the magic of Google, I discovered the most glorious way to  save the cheese! Fromage Fort! You can’t really go wrong with the combination of cheese. I used some blue, Boursin, goat, brie and parm. Delicious.

Serving wise, baguette, crackers, even some crudités would be great to serve with this. I used toasted gluten-free bread. If I had been by myself, I probably would have just used a spoon.

Final word of advice, get on this. Stat!

Fromage Fort
Adapted from Smitten Kitchen

Ingredients

  • 1 pound mix leftover cheese, harder cheeses grated, softer ones cut into chunks
  • A couple pats of butter, if using mostly firm cheese varieties
  • 1-3 small clove garlic, minced, or more to taste
  • 1/2 to 1 cup leftover white wine
  • 1 to 2 tablespoons finely chopped fresh herbs, such as parsley, thyme, rosemary or chives
  • Salt and freshly ground black pepper to taste

Instructions

  1. Blend cheese, butter (if using) and garlic in food processer until combined. Drizzle in wine with the motor running until you get your desired consistency — some like it completely smooth, others prefer chunks. Add herbs, pulsing the machine until just combined. Season to taste with salt and pepper.
  2. Fromage fort can be used right away, or kept in the fridge until needed. In the fridge, it will thicken and age a little; the flavors will mingle and deepen. Let sit out for a few minutes to slight soften and make serving easier.


Red, White & Blue(berry) Quinoa Salad

Red, White & Blue(berry) Quinoa Salad

I think this salad is a perfect for any 4th of July picnic or barbecue. Not only are the colors fun and spot on for the holiday, the ingredients are absolutely fantastic together! The salty blue cheese, earthy quinoa and sweet blueberries each bring great flavors that manage to complement each other perfectly.

I used balsamic raspberry vinegar, which unfortunately muddled the color of the quinoa and blue cheese a bit. I know if I used a little vinegar (white wine, cider) the color would be perfect. I also found the raspberry balsamic to be a bit too sweet for my personal taste. The tangy blue cheese helped tone it down slightly, but I think I would try a less sweet vinegar next time.

Red, White & Blue(berry) Quinoa Salad


Red, White & Blue(berry) Quinoa Salad
Adapted from here.

For the Dressing

  • s5 Tablespoons balsamic raspberry vinegar (or vinegar of choice)
  • 1-2 Tablespoons olive oil
  • Kosher salt and freshly ground pepper, to taste
For the Salad:
  • 1 cup uncooked red quinoa
  • 2 cups low sodium vegetable broth (or water)
  • 1 pint fresh blueberries
  • 8 ounces fresh raspberries
  • 8 ounces blue cheese, crumbled
  • 3 Tablespoons fresh chives, finely chopped
  1. Before cooking the quinoa, soak it in some cold water (about 20 minutes) to rinse off some of its natural bitterness.
  2. Add quinoa and broth to small saucepan. Bring to a boil, reduce heat to a simmer and cook until all the broth has been absorbed and the quinoa is tender (about 15 minutes).
  3. While the quinoa is cooking, mix the dressing together and set aside.
  4. Add the blue cheese, chives and place this in with all the blueberries into a large bowl.
  5. Once you drain the quinoa, cool it off till it is slightly warm or room temperature and pour the raspberry vinaigrette and mix that through.
  6. Let the quinoa cool down some more before mixing in the cheese, blueberries and chives (otherwise your blue cheese will melt.)
  7. Gently fold in raspberries before serving, being careful not to smush them.

Sweet Potato & Blue Cheese Quesadillas with Balsamic Onions

Sweet Potato & Blue Cheese Quesadillas with Balsamic Onions

Let’s talk about leftovers. They just never seem to go away. Thanks to a nifty turkey curry, all of our turkey is gone, but we still have a ton of other things left. Our sweet potatoes seem to be multiplying in the fridge. We made a great horseradish sweet potato dish for Thanksgiving. The horseradish gave the potatoes a little bite that went perfectly with the blue cheese and balsamic onions. Any sweet potatoes will work though. Overall the combination of flavors were perfect. Tortillas are a really great tool for transforming leftovers. Using the sweet potatoes in a quesadilla not only was a great way to use up your leftovers, but it makes for a quick lunch or an easy appetizer to share.

Sweet Potato & Blue Cheese Quesadillas with Balsamic Onions

Sweet Potato & Blue Cheese Quesadillas with Balsamic Onions

  • 1/4 onion, finely sliced
  • balsamic vinegar
  • 1/4 cup leftover mashed sweet potatoes
  • 2 Tablespoons crumbled blue cheese
  • 2 Tablespoons chopped walnuts, lightly toasted
  • 2 tortillas (I used corn)
  • Leftover cranberry sauce, for serving
  1. Take the finely sliced onion and place in a shallow bowl. Pour in enough balsamic vinegar to cover the onions and allow to sit for at least 15 minutes. (Save the vinegar for another use, like vinaigrette or marinade.)
  2. Heat tortillas in a pan over medium-high heat.
  3. Reheat sweet potatoes and spread over one of the heated tortillas. Top with blue cheese, walnuts and onions.
  4. Place other tortilla on top and slice into quarters (pizza cutters are great for this).
  5. Serve with cranberry sauce for dipping.

Baby Cheesecakes with Toffee Pears

Baby Cheesecakes with Toffee Pears

Earlier today I was discussing baked goods with my friend Zack (we don’t like them). This whole conversation came out of a discussion of birthday cakes (it’s my birthday today, we were just randomly discussing cakes). I like savory things much better. Personally I would be much happier if someone gave me a wheel of brie or blue cheese, stuck a candle in it and called it a day. There is one exception to my dessert rule and that would be cheesecake. I do like cheesecake.

This isn’t your typical cheesecake. There is blue cheese involved, which is initially why I wanted to make this. Combining my favorite cheese and my favorite dessert just seemed like a brilliant idea. I was slightly hesitant about the fact that there is no sugar added into the cheesecake. One of them fell apart when I was removing them from the muffin tin and I stole a bite and it was not a good idea. Luckily when I served them with the pears, it was a very enjoyable (and unusual) combination. I had enough crust for 14 cheesecakes, but only enough filling for 13. I would recommend only doing 12 as some of my came out a little thin on the cheesecake end of things. Luckily I like my cheesecake on the crustier side of things, so I wasn’t too bothered by that.

Baby Cheesecakes with Toffee Pears

Baby Cheese Cakes with Toffee Pears
Adapted from Better Homes & Gardens.

  • 3/4 cup quick-cooking rolled oats (I used Bob’s Red Mill Gluten Free Oats)
  • 1/4 cup finely chopped walnuts
  • 1/4 cup packed brown sugar
  • 3 Tablespoons butter, melted
  • 1-8 ounce package cream cheese, softened
  • 1 egg
  • 2 ounces crumbled blue cheese
  • 1/4 cup dairy sour cream
  • 2 tablespoons butter
  • 1/2 cup packed brown sugar
  • 2 tablespoons whipping cream
  • 4 pears, cored and sliced
  • 1/4 teaspoon vanilla
  • 1/2 cup lightly toasted broken walnuts
  1. Preheat oven to 375 degrees F. Line eight 2-1/2-inch muffin cups with foil or paper bake cups; set aside.
  2. For crust, in bowl stir together oats, 1/4 cup walnuts, 1/4 cup brown sugar, and 3 tablespoons butter until combined. Spoon 2 rounded tablespoons oat mixture into each prepared muffin cup. With bottom of a narrow glass press down lightly. Bake 8 minutes or until lightly browned. Cool slightly on wire racks. Reduce oven temperature to 325 degrees F.
  3. For cheesecake filling, in medium bowl beat cream cheese with an electric mixer on medium to high speed until smooth. Add egg and beat just until combined. Stir in blue cheese and sour cream.
  4. Spoon well-rounded tablespoons of the cheese mixture into each crust-lined muffin cup. Bake 20 minutes or until slightly puffed and set. Cool 30 minutes. Remove from cups. Place on tray, cover and refrigerate at least 2 or up to 24 hours. Let stand at room temperature for 30 minutes before serving.
  5. For Toffee Pears, in large skillet melt the 2 tablespoons butter over medium heat. Add the 1/2 cup brown sugar and cream. Cook and stir until bubbly. Add pears. Cook, stirring occasionally, 5 minutes or until pears are tender. Remove from heat. Stir in vanilla. Cool slightly.
  6. To serve, remove foil or paper liners from cheesecakes. Spoon about 1 tablespoon brown sugar-cream mixture into each of the dessert dishes. Top with a cheesecake. Spoon pears around cheesecake. Sprinkle each with toasted walnuts.

Brussels Sprouts & Gorgonzola Salad with Cranberries

Brussels Sprouts Gorgonzola Salad with Cranberries

So my Brussels sprout obsession is back in full swing again. They are everywhere and it is glorious. I have been doing a lot of roasting with Brussels sprouts and that’s all well and good, but sometimes I don’t have the patience to roast things. I have my favorite B. sprout salad that I make quite frequently, but I was in the mood to switch things up. This salad seemed like the perfect alternative.

I thought that the blue cheese and cranberries were the perfect combination of tangy and tart. They really worked well together. The only thing I wish I had added to this salad were some toasted walnuts. This is probably just because I’m so used to my favorite Brussels sprouts salad having toasted walnuts in it, but I really think the earthy, toasted flavor would have complemented and really balance out the rest of the salad.

Brussels Sprouts & Gorgonzola Salad with Cranberries
Slightly adapted from Coconut & Lime.

For the Salad
    • 1 pound Brussels sprouts, trimmed, cleaned and shredded (should yield about 5 shredded cups)
    • 4 ounces finely crumbled Gorgonzola
    • 1 small red onion, halved and finely diced
    • 1/3 cup sweetened dried cranberries
For the Dressing
  • 1 1/2 Tablespoons grainy dijon mustard
  • 1/4 cup unfiltered apple cider vinegar
  • 1/4 cup mayonnaise or greek yogurt (I used a combination)
  • Kosher salt and freshly ground black pepper, to taste

In a small bowl, whisk together the dressing ingredients. Set aside. In a large bowl, toss together the Brussels sprouts, Gorgonzola, onion and cranberries. Drizzle with dressing. Toss to evenly distribute. Serve immediately or refrigerate 1 hour.

Broccoli and Blue Cheese Salad & Some Great Labor Day Sides!

This quick and tasty salad would be a perfect side dish for any barbecue you are attending this coming Labor Day weekend. The broccoli and blue cheese-buttermilk dressing go together so well and the nuts give the salad a great crunch.

If you need any inspiration for Labor Day weekend, be sure to check out these recipes as well:

Broccoli and Blue Cheese Salad (From Real Simple, September 2011, p. 236)

  • 1 bunch of broccoli, cut into florets
  • 1/4 cup buttermilk
  • 2 tablespoons sour cream or plain greek yogurt
  • 2 ounces crumbled blue cheese
  • 1 scallion, sliced
  • 1/2 teaspoon red wine vinegar
  • 1/2 cup toasted walnuts or almonds
  1. Steam broccoli until tender, 5 to 7 minutes; rinse with cold water to cool
  2. In a small bowl, mix together buttermilk, sour cream, blue cheese, scallion, red wine vinegar. Season with salt and pepper.
  3. Top broccoli with the buttermilk dressing and nuts.
  4. Serve and enjoy!