Gluten-Free Pizza Bianca with Caramelized Onions, Goat Cheese, and Spinach

Pizza Bianca with Caramelized Onions & Spinach

A while ago I read about Pillsbury coming out with a line of gluten-free doughs. As much as I love making my own doughs, I wanted to test out the doughs and see how they held up to my own. My first test was with their thin crust pizza dough. It’s hard to find a good gluten free thin crust pizza and I’ve yet to find a gluten-free one that is on par with gluten filled dough.

Straight out of the oven, the crust was great. Super thin and crunchy. I have never had a gluten-free pizza crust get this crispy before. After a few minutes, the quality of the crust went down hill. The pizza turned rock hard, almost to the point of being too hard to even eat. With the leftovers, it was probably the one time I was happy to zap the pizza in the microwave so the crust would soften up a bit. This was my first time using this dough, so it could be entirely my fault for rolling it out too thin. I will definitely buy the dough again in the future because the convenience is nice, but I might leave the dough a bit thicker next time and see how it fares.

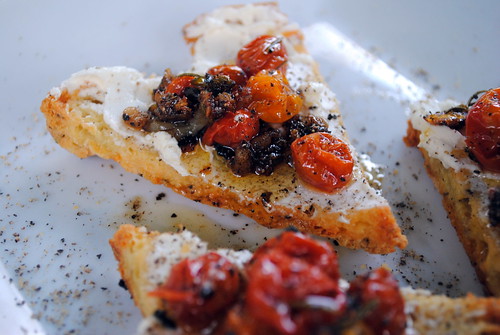
The toppings on the pizza were absolutely delicious. This was more of a ‘clean out the fridge’ kind of meal than a planned recipe, but it made for a great lunch. The caramelized onions can be a time consuming addition to the pizza, but caramelized onions make everything better so I think they are worth the effort. I wanted to get a bit more color on the goat cheese, but as you can see the crust was already quite brown, so I decided not to risk burning it.

Disclaimer – I wasn’t compensated in any way for this post. I just like trying out new to me products and thought I would pass along my thoughts.

Gluten-Free Pizza Bianca with Caramelized Onions, Goat Cheese, and Spinach

Ingredients

  • 1 container of Pillsbury Gluten Free Pizza Dough (or pizza dough of choice)
  • 1 Tablespoon extra-virgin olive oil, divided
  • 3 large garlic cloves, minced
  • 1/2 cup grated mozzarella
  • 1 large onion, thinly sliced into half moons
  • 2 cups baby spinach
  • 1/2 a log of goat cheese, cut into slices

Instructions

  1. In a large skillet, heat 1/2 Tablespoon of oil over medium-high and add onion when oil is heated. Stir to coat onion with oil and allow onion to cook for 10 minutes. Reduce heat to low, sprinkle in a bit of salt, stir again and allow onions to continue darkening and caramelizing stirring every 10 minutes or so, until desired color has been reached. Remove from oil.
  2. Add spinach to remaining oil in the skillet and sauté until slightly wilted, then remove from skillet.
  3. Heat oven to 400°F. Grease cookie sheet and hands. Press dough into 11-inch round on cookie sheet.
  4. Sprinkle the minced garlic over the dough and lightly brush with half the olive oil. Bake 12 to 14 minutes or until edge is beginning to brown.
  5. Sprinkle mozzarella over the crust, top with onions and spinach and goat cheese slices.
  6. Return crust to the oven and bake 8 to 10 minutes longer or until crust is deep golden brown and cheese is melted. Top with basil leaves. Cool 5 minutes before serving.

Hatch Chile Egg Puff with Roasted Hatch Chile Salsa

Hatch Chile Egg Puff with Roasted Hatch Chile Salsa

It’s hatch chile season! I don’t know if hatch chiles are a big thing outside of the southwestern United States, but they have been on my radar for several years now, and their popularity only seems to be growing. Fine by me!

I absolutely loved this egg dish. The flour helped make it super light and fluffy (or puffy I guess) almost like a soufflé, which made breakfast feel kind of fancy. Plus, it was super easy to make! I liked using the cottage cheese in it too since it gave the dish a creamy texture and an extra dose of protein. 

Salsa making time!!! #hatchchiles

I rarely buy salsa, but I was super intrigued by a jar of roasted hatch chile salsa I saw at Costco and decided to just go for it. Excellent decision. It was so good, I had to make an additional trip to Costco and get two more jars the next day, but at $7.99 a pop, it was turning into a rather expensive habit. Naturally, I decided to try to make my own! I used a pound of hatch chiles, a pound of jalapeños, around four pounds of tomatoes of various shapes and forms, one extremely large onion that weighed nearly two pounds. Of the five heads of garlic pictured, tragically only four just four of them made it into the salsa. I roasted everything over the flames on my stove (using this method, it’s super simple), except the garlic, which I did in the oven. You could definitely do everything in the oven if you wanted. Once everything was peeled, I threw them in the blender and spun everything around a few times until I go the consistency I wanted and proceeded to use this salsa on absolutely everything. It was delicious.

Hatch Chile Egg Puff with Roasted Hatch Chile Salsa

Hatch Chile Egg Puff with Roasted Hatch Chile Salsa

  • 1/2 cup all-purpose flour (I used Better Batter)
  • 1 teaspoon baking powder
  • 2+ teaspoons garlic powder
  • 8 eggs
  • 2 cups small curd cottage cheese
  • 1/4 cup shredded Monterey Jack cheese
  • 1/4 cup shredded sharp Cheddar cheese
  • 2 green onions, chopped
  • 2 roasted green hatch chiles, peeled, veined, seeded and diced -OR- 1 (7 ounce) can diced green hatch chilies, drained
  1. Preheat oven to 350 degrees F (175 degrees C). Lightly spray a 7×11 inch casserole dish.
  2. Sift together flour, baking powder and garlic powder. In a separate bowl, beat eggs well. Gradually stir in flour mixture. Blend in cheeses, green onions, and chilies. Pour batter into prepared casserole dish.
  3. Bake in preheated oven until firm and a toothpick inserted into center of the loaf comes out clean, about 35 to 45 minutes.


Blue Barn Arugula Salad

Blue Barn Arugula Salad

So, this is my recreation of a salad I’ve never eaten, from a restaurant I have never been to, but have talked about going to a lot. Blue Barn is a deli in San Francisco that has a creative menu with a local and organic focus. I think every time I have gone to visit my friends in San Francisco we have discussed going there and even attempted to go twice, but every single time something thwarts our plans. Since so many attempts have been made to get to this restaurant I have looked over their menu many times and every time this salad stood out to me.

Blue Barn Arugula Salad

After my last trip to San Francisco and another failed visit to the restaurant, I decided to attempt my own version. I have absolutely no idea how close or accurate an interpretation this is of the Blue Barn original, but damned if I can, it was absolutely delicious!

Blue Barn Arugula Salad

I did make a couple minor changes. Instead of sun-dried tomatoes, I used oven roasted roma tomatoes and instead of grilled balsamic onions, I again used oven roasted balsamic onions (I used this recipe, minus the sugar). For the crispy chickpeas, I made garlic and paprika roasted chickpeas (using this recipe). They were delicious and the leftovers made for a great snack later in the week.

Now, I will admit, there are a lot of parts to this salad and most of them have to be prepared individually ahead of time, which is kind of a major pain, but since I knew I would like all the ingredients in the salad, I didn’t mind taking the extra time and effort to prepare everything. Plus, you’ll have a lot of leftovers of the individual ingredients, so they are perfect for other salads during the week, adding to other meals (the roasted tomatoes and balsamic onions were heavenly with a turkey burger), or as snacks.

Blue Barn Arugula Salad

Ingredients

For the Vinaigrette:
  • 2 Tablespoons Dijon mustard
  • 1 Tablespoon grainy dijon mustard
  • 3 Tablespoons olive oil
  • 2 cloves garlic, minced
  • 1 lemon, juiced
  • freshly ground pepper, to taste
For the Salad:
  • 1 large handful mixed greens
  • 1 large handfuls arugula
  • 1 ounce grated manchego
  • 1/4 cup marinated artichoke hearts
  • 2 Tablespoons slivered almonds, toasted
  • 2 whole roasted roma tomatoes
  • 1/3 cup roasted balsamic onions
  • 1/3 cup roasted chickpeas

Instructions

For the Vinaigrette:
  1. Whisk all the ingredients together in a small bowl and set aside.
For the Salad:
  1. Prepare all the ingredients. Combine all ingredients in a large bowl. Drizzle with dressing. Add freshly ground pepper to taste and serve.


Pineapple Jicama Salad with Cilantro Vinaigrette

Pineapple Jicama Salad

This salad is sweet, tangy and delicious. I originally read a similar recipe in a magazine while sitting in the waiting room at my dentist’s office. I was intrigued because I love love pineapple, but it had cucumber in it, which I absolutely abhor! Cumber is one of the four foods in the world that turn me into a picky eater toddler throwing a tantrum at the dinner table. I will not eat them. I do not like them touching my food and I will sit and pout if they are near my plate (bananas, celery and eggplant would be the others). I have been using a lot of jicama this summer and thought that it would make a great substitute for cucumber. It has the same kind of crunchy texture.

I served this salad with a side of chips for a super chunky chips and salsa kind of thing. You could also serve it over a bed of mixed greens or it would also go great with some grilled shrimp or tequila lime chicken as well.

Pineapple Jicama Salad

Pineapple Jicama Salad with Cilantro Vinaigrette

Ingredients

For the Vinaigrette:
  • 2 Tablespoons fresh lime juice
  • 2 Tablespoons rice vinegar
  • 1 bunch fresh cilantro, minced
  • 1/2 teaspoon salt
  • 1/4 teaspoon ground black pepper
  • 1/4 teaspoon ground cayenne pepper
  • 2-4 Tablespoons olive oil (I used 3)

For the salad:

  • 1/2 fresh pineapple, peeled, cored, and cut into chunks
  • 1 small jicama, peeled and diced into cubes
  • 1 small red onion, finely diced
  • 1 (15-ounce) can black beans, drained and rinsed
  • 1 cup cherry tomatoes, halved
  • 1 avocado, pitted and diced

Instructions

For the Vinaigrette:
  1. Combine all the ingredients in a bowl and whisk together until well blended. Set aside. (Vinaigrette can be made ahead of time and will keep in the fridge for about 1 week.)
For the salad:
  1. Combine all ingredients, except the avocado, in a bowl and mix together. Add desired amount of vinaigrette and toss to coat. Salad can now be kept in fridge for up to 4 hours or served immediately.
  2. Right before serving add avocado and gently toss to to coat avocado with dressing, but be sure not to mush it too much.

Halloumi, Snap Pea & Tomato Quinoa Salad

Halloumi, Snap Pea, Tomato & Quinoa Salad

I’ve been on a bit of a halloumi kick lately. Normally I would feel bad about sharing recipes with ‘exotic’ ingredients in them, like halloumi, but now that Trader Joe’s now sells this amazing cheese, I would hardly count it as exotic anymore.

This salad is not only quick and easy to make, it is delicious too. The snap peas and tomatoes around here are absolutely delicious at the moment. Their sweetness combined with the salty halloumi help makes every bite delicious. The dressing is light and flavorful. It really adds to the salad and helps all the delicious flavors come together.

Halloumi, Snap Pea, Tomato & Quinoa Salad


Halloumi, Snap Pea & Tomato Quinoa Salad

For the Dressing:
  • 4 Tablespoons plain Greek yogurt
  • 2 Tablespoons lemon juice
  • 1/2 Tablespoon fresh parsley, minced
  • 1/2 Tablespoon fresh basil, minced
  • 1/2 Tablespoon fresh chives, minced
For the Salad:
  • 2 teaspoons olive oil
  • 1 pack Halloumi, cut into slices
  • 1/2 pound cherry tomatoes
  • 4 ounces snap peas, cut into pieces
  • 12 ounces mixed spring greens
  • 2 cups cooked quinoa
  1. Combine all ingredients for the dressing in a small bowl. Mix to combine and set aside.
  2. In a large pan heat the olive oil over medium-high heat. When oil is hot, add halloumi and cooked until golden brown, about 2-3 minutes. Flip and repeat on the other side. Place cooked halloumi on paper towels to drain excess oil.
  3. In a large bowl, combine greens, snap peas and tomatoes and about half the dressing. Toss to mix all the ingredients.
  4. Divide between 4 serving bowls. Top with about 1/2 cup of the cooked quinoa and 2-3 slices of the halloumi and serve.


Zucchini Noodles with Cilantro Pesto & Halloumi AND a Giveaway!

Zucchini Noodles with Cilantro Pesto & Halloumi

Disclosure: The Veggetti®, gift card, information, and additional gift pack have been provided by Ontel. All thoughts and opinions are my own. 

I have wanted to get a spiralizer for a while now, but the cost, size and valuable kitchen storage space it would take up always prevented me. Enter the Veggetti! The Veggetti is a handheld device that quickly turns your veggies into veggie noodles. Veggie noodles offer not only a healthier, lower-carb alternative to regular pasta, but a gluten free one too. The Veggetti is also quick and easy to use and it’s dishwasher safe, which makes clean up a breeze.

I have used my Veggetti with zucchini, squash, potatoes, and carrots. All of them worked out perfectly, except for the carrots. I think the carrots I tried to use were too narrow. So far I am really impressed by how easy the Veggetti is to use, how sturdy it is and how small it is. It fits perfectly in a kitchen drawer. The only downside I have found, and it’s kind of a silly one, is how insanely long the noodles are. I would definitely recommend cutting them up once you are done spiralizing them.

If you would like to get your own Veggetti® , you can go here to learn more at www.getveggetti.com OR you can enter my giveaway! One reader will win a Veggetti of their very own – plus a $25 Visa Gift Card to stock their vegetable crisper!

TO ENTER: 

a Rafflecopter giveaway


Zucchini Noodles with Cilantro Pesto & Halloumi

  • 1 zucchini
  • 1 summer squash
  • 1 pack of halloumi cut into slices
  • 1 teaspoon olive oil
  • 1/2 cup cherry tomatoes
  • 1/4 red onion, diced
  • 1/4 cup kalamata olives, halved
For the Cilantro Pesto:
  • 1/4 cup blanched almonds
  • 4+ garlic cloves, minced
  • 1/4 cup cotija cheese (or parmesan), grated
  • 1 bunch cilantro, with most of the stem removed
  • 1/4 cup olive oil
  • 1/2 of a lemon, juiced
  • 1 generous pinch red chili flakes (optional)

Instructions

  1. Use the Veggetti to spiralize the zucchini and squash and set aside.
  2. In a medium skillet, heat the olive oil over medium-high heat. When oil is shimmering, add halloumi and cook until golden brown, about 3 minutes. Flip and repeat on the other side. Place on a paper towel to drain.
  3. In a large bowl, toss the zucchini noodles with as much cilantro pesto as you like and the rest of the ingredients, except the halloumi. Divide between two plates and top with halloumi and serve.
  4. For the Pesto
  5. Place the almonds in a food processor until they are finely ground. Add the remaining ingredients and pulse until desired consistency is reached.

Delica’s Wasabi Potato Salad

Delica's Wasabi Potato Salad

So, I briefly mentioned yesterday, I am moving to the other side of the country in 27 oh, so short days. I’ve been hell bent on getting in as many of my favorite summer things, California things, and summery California as possible. I have lists of food, shops, cities, friends, beaches, parks, drinks and many more random things.

A couple of weekends ago I got to cross a whole bunch of things off my list with a trip up to San Francisco. There were friends and food and shopping and pugs and crafts and it was glorious. Apart from the fact that many of my best friends live in San Francisco now, it’s always been one of my favorite cities. There is so much to do and see and, most importantly, eat! This salad is inspired by one I had at Delica many, many trips ago. Delica is a great Japanese deli and sushi bar in the Ferry Building. And while a Japanese deli might seem like the last place you would find an amazing potato salad, trust me they definitely know what they are doing.

I will admit, I have met very few potatoes I haven’t liked (I am 100% Irish, it’s pure genetics), but potato salads wade into a tricky gray area. A great potato salad is a thing of delicious beauty, but it is so, so easy for a potato salad to go horribly wrong very easily. Delica’s potato salad is so different than any other potato salad. First, the wasabi! I love wasabi and even though I have added I have used horseradish in potato salads before, I never thought of using wasabi. It’s a great flavorful addition. I might be strange in the fact that I always mix my summer barbecue side salads together. That potato salad and green salad will soon become one on my plate, so I absolutely love that Delica’s potato salad already has romaine lettuce and snap peas and other traditional green salad staples in the potato salad itself. If you are looking for a totally different and delicious potato salad recipe, I suggest you start here!


Delica’s Wasabi Potato Salad

  • 1 pound Yukon gold or yellow potatoes
  • 1/2 cup plain Greek yogurt (you can use mayo or sour cream as well or a combo)
  • 2+ cloves garlic, minced
  • 2 teaspoons wasabi paste (or more if you like it with a kick!)
  • 1 teaspoon kosher salt
  • 1 cup edamame beans, fresh or thawed
  • 1 handful snap peas, trimmed and halved
  • 2 romaine hearts, chopped


  1. Wash and peel potatoes. Cut into 1″ cubes.
  2. Put potatoes into a pot of salted water and bring to a boil. Reduce heat and simmer until you can insert a fork and easily remove it (about 10-15 minutes). Don’t overcook! Drain potatoes and let cool.
  3. Meanwhile, whisk together the yogurt, garlic, wasabi paste, and salt.
  4. Toss with edamame, snap peas, and romaine hearts with the yogurt. Fold in the potatoes and gently stir until combined.
  5. Cover and chill before serving.

Tomato Basil Spread

Basil Tomato Spread

A few weeks ago I was up visiting my best friends and her husband and pugs in San Francisco. They have the cutest farmers’ market right around the corner from them on the weekends and we took a visit before I had to head home. One of the stalls (Hummus Heaven) was selling absolutely delicious hummus and pita chips. They also had some incredible dips and spreads. I fell in love with the tomato basil spread. It was light, tangy, garlicky and fresh. It was delicious with pita chips, but I also used it for dipping veggies, crackers and as a sandwich spread. All wining combinations.

Since I (tragically) have no clue when my next visit to San Francisco will be, I decided I needed to attempt to recreate it. I will say that the original was a little more creamy (almost mayo/aioli like), but I wasn’t really in the mood to keep adding oil or mayo to get mine to the same consistency. I thought that some greek yogurt might take it more in that direction, but it didn’t. It did help it make it more like a dip or sandwich spread, which was perfect for me. I did save a little of the original to do a side by side taste test and that my version is  just as good as the original, if not a little bit better.

Tomato Basil Spread

  • 4+ cloves garlic
  • 6 ounce can tomato paste
  • freshly ground pepper, to taste
  • 4 sprigs fresh thyme leaves
  • 1/2 teaspoon oregano, dried
  • 10-15 basil leaves, roughly torn
  • 1 Tablespoon olive oil
  • 1/2 cup greek yogurt, plain
  1. Combine all ingredients in a food processor and pulse to combine until desired consistency is reached (I did mine so it was very smooth).


Slow Roasted Tomatoes with Goat Cheese & Gluten Free Focaccia

Oven Roasted Tomatoes with Goat Cheese & Gluten Free Focaccia

Summer seems to be flying by and I feel like the end of it, is unfortunately in sight. This week I want to share recipes that feature some of my favorite summer produce so everyone can get as much tasty enjoyment out of the month or so we have left.

Oven roasted tomatoes became one of my favorite things this summer and if I can keep some around long enough (most are consumed via fork straight from pan), this is one of my favorite ways to eat them. I know turning on the oven in the middle of summer is something only crazy person would do, but just trust me, it’s worth it. Plus, you are turning on the oven so low, you won’t be able to notice any big temperature change. I promise!

I cannot even begin to describe how incredibly delicious these tomatoes are. I used cherry tomatoes in this particular instance, but I’ve used just about every tomato imaginable and they are all just as amazing. I served these with softened goat cheese and gluten-free focaccia, but the possibilities are endless. I’ve used them on salads, in a caprese salad, the top of soups, crackers and, as I already mentioned, my favorite method with a fork straight from the pan.

One minor note, if you are using larger tomatoes: cut the tomatoes in half first, remove the stem (if desired) and place them cut side down on the pan when you go to roast them.

Slow Roasted Tomatoes with Goat Cheese & Gluten Free Focaccia

  • around 1-1.5 pounds cherry tomatoes
  • 2 Tablespoons olive oil
  • 8-10 sprigs fresh thyme
  • 4-5 sprigs fresh rosemary
  • 4-8 cloves garlic, very thinly sliced
  • Kosher salt and freshly cracked pepper
  1. Heat oven to 225F.
  2. Pour the olive oil into a shallow baking dish or pan and add the garlic, thyme, rosemary, and salt and pepper.
  3. Toss the tomatoes with the oil and seasonings in the dish.
  4. Bake for two hours, or until the tomatoes are completely softened and wilted, and start to wrinkle. Depending on the tomatoes, they may take longer to cook.


Fiesta Bean Salad

Fiesta Bean Salad

It’s that time of year again… Fiesta! I haven’t blogged for a couple months, but I’m now in my final stretch living in California (for a while at least), so I figure I might as well enjoy and share as much of the Golden State as I can! Fiesta is a truly unique Santa Barbara tradition. Officially 90 years strong as of this Wednesday. It’s a unique blend of culture, history, food, music, dance and booze. Basically the world’s best combination in my opinion. This week I’m going to share some of my favorite, both new and old, Mexican inspired recipes.

Fiesta Bean Salad

I love this salad! It’s fast and easy. Light and fresh. And it makes a perfect alternative side dish to a Mexican meal instead of traditional black or pinto bean dishes. I had originally planned on serving this as a side dish with tequila lime chicken, but I was so hungry for lunch that I decided to skip the rest of the meal and just dig in. Excellent decision. If you wanted to add some more bulk to the salad, some chopped romaine would be great. If I had some cilantro on hand (my plants have refused to last longer than 5 days this summer!) or corn kernels (I can’t eat whole corn, but if you can), I know both would have made the best addition.

Fiesta Bean Salad
Adapted from Skinnytaste.

  • 2+ cloves garlic, minced
  • 3 limes, juiced
  • 1 Tablespoon extra virgin olive
  • 1 teaspoon cumin
  • pinch crushed red pepper flakes
  • 1/2 teaspoon salt
  • 15 ounce can black beans, rinsed and drained
  • 15 ounce canned chickpeas, rinsed and drained
  • 1 cup cherry tomatoes, halved
  • 1/2 red onion, finely diced
  • 1 medium avocado, diced
  • 1/2 jicama, cut into thin matchsticks
  • 2 ounces queso fresco (or feta), crumbled
  1. In a large bowl, combine the garlic, lime juice, oil, cumin, crushed red pepper, and salt.
  2. Add the black beans, chickpeas, tomato, onion and jicama. When ready to eat, gently mix in avocado, sprinkle with queso fresco and serve right away.