Halloumi & Bacon Rolls

Halloumi & Bacon Rolls

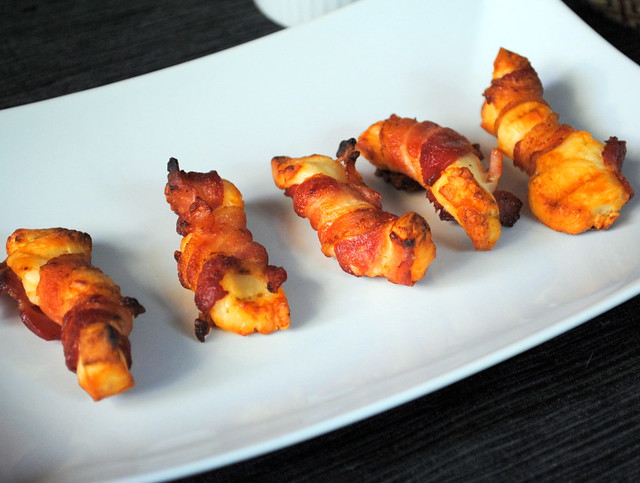
Oh my goodness. These are amazing. Quick warning, you should probably make a double batch of these because they are not going to be around for long. I mean, cheese and bacon, what’s not to love? Nothing obviously.

Whether you are having friends over to watch football or hosting a fancy dinner party, these little bites are sure to be a hit. I highly recommend letting these get nice and brown and crispy (soggy bacon is just nasty). I served mine with Dijon mustard just to add a little extra something. Totally not necessary, but definitely a tasty addition. I’m a saucy person, so I like having dipping sauces on the side of just about everything. I think a smokey barbecue sauce would also be really tasty.

Halloumi & Bacon Rolls

  • 1 block halloumi
  • 10 rashers of center cut bacon


  1. Heat oven to 400. Line a baking sheet with tinfoil and place a baking rack on top of the tinfoil.
  2. Cut the halloumi into 20 sticks. stretch each rasher of bacon with the back of a knife, then cut in half.
  3. Roll the bacon around the halloumi in a spiral and arrange on the baking rack. Bake for 15-20 mins or until the pancetta is brown and crispy.

Gluten-Free Pizza Bianca with Caramelized Onions, Goat Cheese, and Spinach

Pizza Bianca with Caramelized Onions & Spinach

A while ago I read about Pillsbury coming out with a line of gluten-free doughs. As much as I love making my own doughs, I wanted to test out the doughs and see how they held up to my own. My first test was with their thin crust pizza dough. It’s hard to find a good gluten free thin crust pizza and I’ve yet to find a gluten-free one that is on par with gluten filled dough.

Straight out of the oven, the crust was great. Super thin and crunchy. I have never had a gluten-free pizza crust get this crispy before. After a few minutes, the quality of the crust went down hill. The pizza turned rock hard, almost to the point of being too hard to even eat. With the leftovers, it was probably the one time I was happy to zap the pizza in the microwave so the crust would soften up a bit. This was my first time using this dough, so it could be entirely my fault for rolling it out too thin. I will definitely buy the dough again in the future because the convenience is nice, but I might leave the dough a bit thicker next time and see how it fares.

The toppings on the pizza were absolutely delicious. This was more of a ‘clean out the fridge’ kind of meal than a planned recipe, but it made for a great lunch. The caramelized onions can be a time consuming addition to the pizza, but caramelized onions make everything better so I think they are worth the effort. I wanted to get a bit more color on the goat cheese, but as you can see the crust was already quite brown, so I decided not to risk burning it.

Disclaimer – I wasn’t compensated in any way for this post. I just like trying out new to me products and thought I would pass along my thoughts.

Gluten-Free Pizza Bianca with Caramelized Onions, Goat Cheese, and Spinach

Ingredients

  • 1 container of Pillsbury Gluten Free Pizza Dough (or pizza dough of choice)
  • 1 Tablespoon extra-virgin olive oil, divided
  • 3 large garlic cloves, minced
  • 1/2 cup grated mozzarella
  • 1 large onion, thinly sliced into half moons
  • 2 cups baby spinach
  • 1/2 a log of goat cheese, cut into slices

Instructions

  1. In a large skillet, heat 1/2 Tablespoon of oil over medium-high and add onion when oil is heated. Stir to coat onion with oil and allow onion to cook for 10 minutes. Reduce heat to low, sprinkle in a bit of salt, stir again and allow onions to continue darkening and caramelizing stirring every 10 minutes or so, until desired color has been reached. Remove from oil.
  2. Add spinach to remaining oil in the skillet and sauté until slightly wilted, then remove from skillet.
  3. Heat oven to 400°F. Grease cookie sheet and hands. Press dough into 11-inch round on cookie sheet.
  4. Sprinkle the minced garlic over the dough and lightly brush with half the olive oil. Bake 12 to 14 minutes or until edge is beginning to brown.
  5. Sprinkle mozzarella over the crust, top with onions and spinach and goat cheese slices.
  6. Return crust to the oven and bake 8 to 10 minutes longer or until crust is deep golden brown and cheese is melted. Top with basil leaves. Cool 5 minutes before serving.

Blue Barn Arugula Salad

Blue Barn Arugula Salad

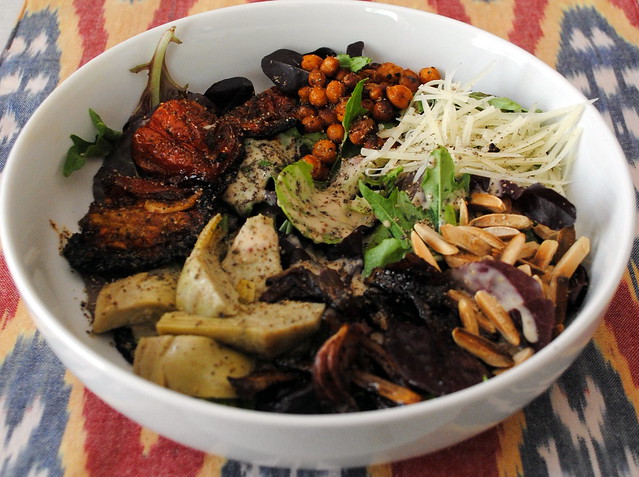
So, this is my recreation of a salad I’ve never eaten, from a restaurant I have never been to, but have talked about going to a lot. Blue Barn is a deli in San Francisco that has a creative menu with a local and organic focus. I think every time I have gone to visit my friends in San Francisco we have discussed going there and even attempted to go twice, but every single time something thwarts our plans. Since so many attempts have been made to get to this restaurant I have looked over their menu many times and every time this salad stood out to me.

Blue Barn Arugula Salad

After my last trip to San Francisco and another failed visit to the restaurant, I decided to attempt my own version. I have absolutely no idea how close or accurate an interpretation this is of the Blue Barn original, but damned if I can, it was absolutely delicious!
Blue Barn Arugula Salad

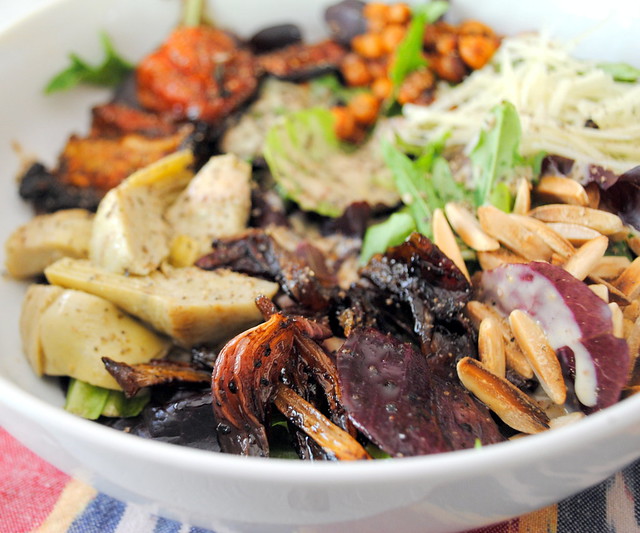
I did make a couple minor changes. Instead of sun-dried tomatoes, I used oven roasted roma tomatoes and instead of grilled balsamic onions, I again used oven roasted balsamic onions (I used this recipe, minus the sugar). For the crispy chickpeas, I made garlic and paprika roasted chickpeas (using this recipe). They were delicious and the leftovers made for a great snack later in the week.

Now, I will admit, there are a lot of parts to this salad and most of them have to be prepared individually ahead of time, which is kind of a major pain, but since I knew I would like all the ingredients in the salad, I didn’t mind taking the extra time and effort to prepare everything. Plus, you’ll have a lot of leftovers of the individual ingredients, so they are perfect for other salads during the week, adding to other meals (the roasted tomatoes and balsamic onions were heavenly with a turkey burger), or as snacks.

Blue Barn Arugula Salad

Ingredients

For the Vinaigrette:
  • 2 Tablespoons Dijon mustard
  • 1 Tablespoon grainy dijon mustard
  • 3 Tablespoons olive oil
  • 2 cloves garlic, minced
  • 1 lemon, juiced
  • freshly ground pepper, to taste
For the Salad:
  • 1 large handful mixed greens
  • 1 large handfuls arugula
  • 1 ounce grated manchego
  • 1/4 cup marinated artichoke hearts
  • 2 Tablespoons slivered almonds, toasted
  • 2 whole roasted roma tomatoes
  • 1/3 cup roasted balsamic onions
  • 1/3 cup roasted chickpeas

Instructions

For the Vinaigrette:
  1. Whisk all the ingredients together in a small bowl and set aside.
For the Salad:
  1. Prepare all the ingredients. Combine all ingredients in a large bowl. Drizzle with dressing. Add freshly ground pepper to taste and serve.
 

Mango Chicken Salad with Blue Cheese Vinaigrette

Mango Chicken Salad with Blue Cheese Vinaigrette

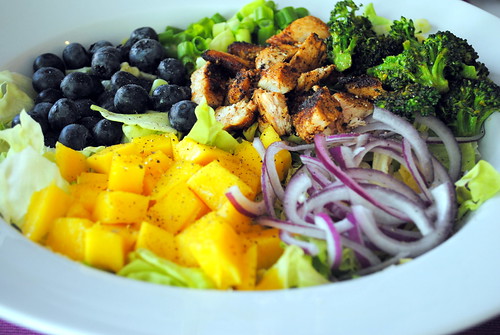
This salad has it all; sweet, salty, cheesy, and all delicious. Mango, blue cheese and broccoli are some of my favorite foods, but never in a million years would I think of combining them. Ever. But somehow, it totally works. The flavor combinations definitely make for a very unique meal.

I definitely plan on making this salad again, but next time I think I might add a couple of other things to make it even better. Adding some toasted cashews or almonds would add a great crunch to the salad. I could also imagine substituting the chicken for shrimp (maybe even coconut shrimp for more of a tropical twist).

Mango Chicken Salad with Blue Cheese Vinaigrette

Mango Chicken Salad with Blue Cheese Vinaigrette
Inspired by Better Homes & Gardens.

For the Vinaigrette:

  • 1/3 cup white-wine vinegar
  • 1 tablespoon Dijon mustard
  • 2 cloves garlic, minced
  • 1/2 cup extra-virgin olive oil
  • 1/2 cup crumbled blue cheese
  • Salt and freshly ground pepper, to taste

For the Salad:

  • 6 cups torn romaine lettuce
  • 2 cups fresh blueberries
  • 1 mango, pitted, peeled, and cut up
  • 12 ounces chicken breast
  • Salt and ground black pepper, to taste
  • 2 Tablespoons unsalted butter or olive oil
  • 3 garlic cloves, minced
  • 2 cups broccoli florets

For the Vinaigrette:

  1. Combine all ingredients in a bowl and whisk together. Season to taste and set aside.

For the Salad:

  1. On a serving platter place romaine lettuce. Top with blueberries and mango; set aside.
  2. Season chicken breast with salt and pepper. In a large skillet cook chicken in 1 tablespoon of the butter with minced garlic over medium heat for 6 to 8 minutes or until no longer pink, turning once. Transfer to a cutting board; slice. Allow to cool slight and arrange atop salad.
  3. In the same skillet cook broccoli in the remaining tablespoon garlic butter over medium heat for 4 to 6 minutes until tender. Place atop salad.
  4. Drizzle salad with blue cheese vinaigrette. If desired, sprinkle with blue cheese.

Halloumi, Snap Pea & Tomato Quinoa Salad

Halloumi, Snap Pea, Tomato & Quinoa Salad

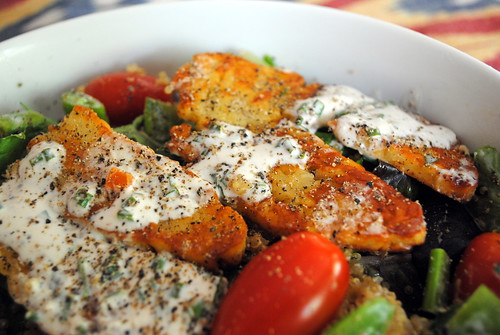
I’ve been on a bit of a halloumi kick lately. Normally I would feel bad about sharing recipes with ‘exotic’ ingredients in them, like halloumi, but now that Trader Joe’s now sells this amazing cheese, I would hardly count it as exotic anymore.

This salad is not only quick and easy to make, it is delicious too. The snap peas and tomatoes around here are absolutely delicious at the moment. Their sweetness combined with the salty halloumi help makes every bite delicious. The dressing is light and flavorful. It really adds to the salad and helps all the delicious flavors come together.

Halloumi, Snap Pea, Tomato & Quinoa Salad


Halloumi, Snap Pea & Tomato Quinoa Salad

For the Dressing:
  • 4 Tablespoons plain Greek yogurt
  • 2 Tablespoons lemon juice
  • 1/2 Tablespoon fresh parsley, minced
  • 1/2 Tablespoon fresh basil, minced
  • 1/2 Tablespoon fresh chives, minced
For the Salad:
  • 2 teaspoons olive oil
  • 1 pack Halloumi, cut into slices
  • 1/2 pound cherry tomatoes
  • 4 ounces snap peas, cut into pieces
  • 12 ounces mixed spring greens
  • 2 cups cooked quinoa
  1. Combine all ingredients for the dressing in a small bowl. Mix to combine and set aside.
  2. In a large pan heat the olive oil over medium-high heat. When oil is hot, add halloumi and cooked until golden brown, about 2-3 minutes. Flip and repeat on the other side. Place cooked halloumi on paper towels to drain excess oil.
  3. In a large bowl, combine greens, snap peas and tomatoes and about half the dressing. Toss to mix all the ingredients.
  4. Divide between 4 serving bowls. Top with about 1/2 cup of the cooked quinoa and 2-3 slices of the halloumi and serve.


Zucchini Noodles with Cilantro Pesto & Halloumi AND a Giveaway!

Zucchini Noodles with Cilantro Pesto & Halloumi

Disclosure: The Veggetti®, gift card, information, and additional gift pack have been provided by Ontel. All thoughts and opinions are my own. 

I have wanted to get a spiralizer for a while now, but the cost, size and valuable kitchen storage space it would take up always prevented me. Enter the Veggetti! The Veggetti is a handheld device that quickly turns your veggies into veggie noodles. Veggie noodles offer not only a healthier, lower-carb alternative to regular pasta, but a gluten free one too. The Veggetti is also quick and easy to use and it’s dishwasher safe, which makes clean up a breeze.

I have used my Veggetti with zucchini, squash, potatoes, and carrots. All of them worked out perfectly, except for the carrots. I think the carrots I tried to use were too narrow. So far I am really impressed by how easy the Veggetti is to use, how sturdy it is and how small it is. It fits perfectly in a kitchen drawer. The only downside I have found, and it’s kind of a silly one, is how insanely long the noodles are. I would definitely recommend cutting them up once you are done spiralizing them.

If you would like to get your own Veggetti® , you can go here to learn more at www.getveggetti.com OR you can enter my giveaway! One reader will win a Veggetti of their very own – plus a $25 Visa Gift Card to stock their vegetable crisper!

TO ENTER: 

a Rafflecopter giveaway


Zucchini Noodles with Cilantro Pesto & Halloumi

  • 1 zucchini
  • 1 summer squash
  • 1 pack of halloumi cut into slices
  • 1 teaspoon olive oil
  • 1/2 cup cherry tomatoes
  • 1/4 red onion, diced
  • 1/4 cup kalamata olives, halved
For the Cilantro Pesto:
  • 1/4 cup blanched almonds
  • 4+ garlic cloves, minced
  • 1/4 cup cotija cheese (or parmesan), grated
  • 1 bunch cilantro, with most of the stem removed
  • 1/4 cup olive oil
  • 1/2 of a lemon, juiced
  • 1 generous pinch red chili flakes (optional)

Instructions

  1. Use the Veggetti to spiralize the zucchini and squash and set aside.
  2. In a medium skillet, heat the olive oil over medium-high heat. When oil is shimmering, add halloumi and cook until golden brown, about 3 minutes. Flip and repeat on the other side. Place on a paper towel to drain.
  3. In a large bowl, toss the zucchini noodles with as much cilantro pesto as you like and the rest of the ingredients, except the halloumi. Divide between two plates and top with halloumi and serve.
  4. For the Pesto
  5. Place the almonds in a food processor until they are finely ground. Add the remaining ingredients and pulse until desired consistency is reached.

Spring Wedge Salad with Carrots, Radishes & Bacon

Spring Wedge Salad with Carrots, Radishes & Bacon

I have said it before, and I will say it again, brunch is my favorite meal. It’s really just great. When it comes to breakfast foods, I kind of have an aversion to sweet and bready things and egg dishes can get a bit boring*, but if I’m at brunch, it means I can totally order a salad at 9 in the morning and it’s not weird. This salad is perfect for brunch or lunch or dinner. I would eat it for any meal really.

Wedge salads are one of my favorite salads and this is such a delicious spring twist on a traditional wedge salad. I was able to get all the ingredients at my farmers market, which made it feel even more seasonally appropriate. The flavors in this salad also worked really well together. I really like the vinaigrette dressing instead of a traditional  blue cheese or ranch, which would have been way too heavy for this salad. The blue cheese crumbles gave the salad a bit of creaminess and tanginess, so you really don’t miss the traditional dressing at all. This was my first time trying radishes and I was hoping that they would be a bit more peppery, they were still a good addition to the meal.

Next time, there is only one thing I would do differently. I would make sure to cut the radishes and carrots as thinly as possible. Even though I used a mandoline to cut them this time, they were still quite thick (my fingers and I don’t have the best track record with the mandoline, so I try not to mess around with it too much) and it made them a bit difficult to chew compared to the rest of the ingredients. I think the carrots would probably be best done thinly with a vegetable peeler and maybe the radishes too.

* – there is one brunch dish and only one brunch dish that combines sweet, bready and eggy that I absolutely love and I’ll be posting it later in the week. Trust me, it is definitely worth the wait!

Spring Wedge Salad with Carrots, Radishes & Bacon
Adapted from Better Homes and Gardens.

Ingredients

  • 1 head iceberg lettuce
  • 6 slices bacon, crisp-cooked and halved
  • 3 carrots, thinly sliced
  • 2 green onions, chopped
  • 6 radishes, sliced and/or chopped
  • 1/2 cup crumbled blue cheese
  • 1/4 cup olive oil
  • 1/4 cup red wine vinegar
  • 3 cloves garlic, mashed
  • 1/4 teaspoon salt
  • 1/4 teaspoon coarse ground black pepper

Instructions

  1. Trim stem from lettuce while leaving the core intact. Cut lettuce in quarters then place the wedges on individual serving plates. Arrange bacon, carrots, green onions, and radishes on and around each wedge. Sprinkle each wedge with blue cheese.
  2. In a screw-top jar combine olive oil, vinegar, garlic, salt, and pepper. Cover tightly and shake until combined. Immediately drizzle over salad.

Gluten Free Goat Cheese & Herb Stuffed Mushrooms

Gluten Free Goat Cheese Stuffed Mushrooms

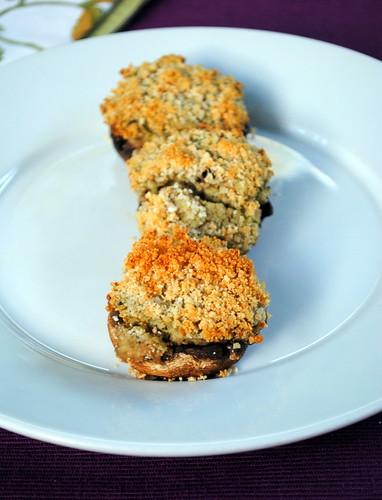
Now that all those cinco de mayo shenanigans are out of everyone’s systems, let’s talk about more important things, like our mothers. I love my mom (hi mom!). She’s one of the few people that religiously reads my blog and she always makes sure to point out when I misspell something. It’s Mother’s Day in the US this upcoming weekend and I have a wonderful weekend of wine tasting and brunch planned for my mama. This week I thought I would share some easy and delicious recipes that would be perfect for a Mother’s Day brunch or any other brunch events you have on the horizon.

This is the simplest appetizer in the world and it’s pretty tasty to boot! You really don’t need all that many ingredients either. Some biggish mushrooms, goat cheese, garlic, herbs, breadcrumbs and a food processor (or a strong mixing arm) and you are good to go. I used fresh parsley, because my parsley plants are out of control at the moment, but you can definitely substitute in any fresh herbs that strike your fancy (basil would probably be really delicious). If you aren’t using a food processor, I would recommend letting the goat cheese soften a fair bit before trying to mix it. I would also make sure to finely chop all your garlic and herbs too.

I recently discovered some new to me gluten free breadcrumbs from The Fresh Market. The Fresh Market just opened a new store in my town and it is wonderful! My aunt on the east coast has raved about TFM for years and I definitely see why! Their own TFM brand gluten free breadcrumbs are great. They are almost like panko. I have had great success with them in meatballs and burgers. I recently tried them as coating/breading with baked chicken and with these mushrooms and have been really happy with the results! If you have a TFM near you, I recommend picking up some breadcrumbs!

Gluten Free Goat Cheese & Herb Stuffed Mushrooms
Recipe from Martha Stewart.

Ingredients

  • 1/2 cup breadcrumbs(I used TFM gluten free breadcrumbs)
  • 2 large garlic clove, coarsely chopped
  • 5 ounces soft goat cheese, crumbled
  • 1/2 cup fresh parsley leaves
  • 1/4 teaspoon red-pepper flakes
  • 1/2 lemon, juiced
  • 12 large mushrooms, wiped clean, stems and gills removed
  • Kosher salt and freshly ground pepper, to taste

Instructions

  1. Heat oven to 400 degrees.
  2. In a food processor, pulse bread and garlic until fine crumbs form; set 3 tablespoons aside.
  3. Add the goat cheese, parsley, red-pepper flakes and lemon juice to food processor. Season with salt and pepper, and pulse filling until combined.
  4. Spoon filling into each mushroom, and roll filled side in reserved breadcrumbs. Place on prepared baking sheet; bake until mushrooms are tender and lightly browned, 15 to 20 minutes.


Gluten Free Green Chile & Mushroom Goat Cheese Queso

Chile & Mushroom Goat Cheese Queso

Last weekend I popped up to San Francisco for a quick visit with friends and my blog and computer decided they wanted a vacation too. Technical problems seem to be resolved for the most part, so let’s get back to it. Cinco de mayo is rapidly approaching and since I like any excuse to eat Mexican food, I plan on taking full advantage of the fact this week. Most of these recipes aren’t super traditional or exactly authentic, but they are delicious enough for any fiesta.

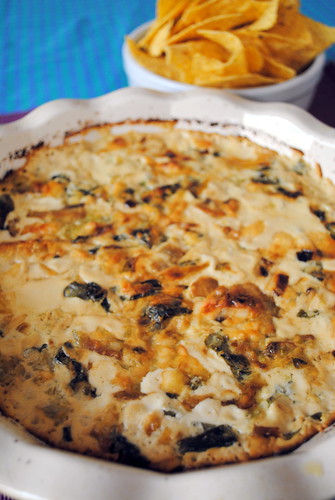
 This queso is super tasty. I added some of my favorite spring ingredients (mushrooms, leeks and spinach) and they really added a lot of flavor to the queso. They mushrooms added a great earthy flavor, which worked really well with the tangy goat cheese. I served my queso with tortilla chips, but it would also go well with veggies, crackers or bread.

My oven, like all the other machines in my life, has also been a bit temperamental lately (had to get the igniter replaced… again…), which has changed my oven’s personality somewhat. It seems to be cooking a bit lower or slower (I’m still trying to figure it out).  After 25 minutes the queso was definitely bubbly and ready to serve, but there was absolutely no color to the top of it, which made it look like a blob of boring, white cheese. It’s not a requirement, but I like a little bit of a brown crust on my baked dips. It took me at least 35 minutes to get any type of color to the dip and as you can see in the picture it still came out a bit splotchy. Despite my odd requirements for baked dip coloration, the end product was delicious.

Gluten Free Green Chile & Mushroom Goat Cheese Queso
Adapted from Whole Foods.

  • 2 teaspoons extra virgin olive oil
  • 1/2 pound mixed mushrooms, thinly sliced
  • 6 ounces goat cheese, crumbled
  • 6 ounces shredded Monterey Jack cheese (about 1 3/4 cups)
  • 1 1/2 cup sliced baby spinach leaves
  • 1 large leek, cleaned and thinly sliced
  • 1/2 cup diced red onion
  • 1 (10 ounce) can green chiles, diced (chop finely if using whole chiles)
  1. Preheat oven to 375°F. In a large skillet, heat oil over medium heat. Add leeks and onion cook until softened and starting to brown, about 10-15 minutes. Add mushrooms and cook, stirring frequently, until mushrooms have released their liquid and are dry and lightly browned, about 10 minutes. Add chopped spinach and cook until just beginning to wilt, about 1 minute. Spread leeks, mushrooms, spinach over the bottom of a small ovenproof casserole or gratin dish. In a large bowl, combine goat cheese, Jack cheese, and chiles and mix until combined. Spread cheese mixture evenly over mushrooms and bake until bubbling, about 25-35 minutes. Serve hot.

Goat Cheese Polenta with Turkey & Vegetable Ragout

Goat Cheese Polenta with Turkey & Veggie Ragu

This dish is pure comfort food if you ask me. It’s hearty enough for a cold winter’s night, but still light enough to be a great transitional meal when spring hasn’t quite decided if it wants to be hot or cold yet. The meat and vegetables make it both filling and nutritious. You will get a lot of leftovers out of this recipes, which is a plus in my book. I also thought that the ragout tasted even better then next day.

Polenta is not everyone’s favorite food, but I happen to really like it. I think it makes a great base for a meal and keeps amazingly well for leftovers. You can top it with just about anything. I really like making my polenta with added goat cheese. It gives it both a creamy and tangy bite that I think goes really well with tomato based sauces.

Goat Cheese Polenta with Turkey & Vegetable Ragout
Adapted from Better Homes & Gardens.

For the Turkey Ragout:
  • 1 1/4 pound extra-lean ground turkey
  • 1 Tablespoon olive oil
  • 1 (14 1/2) ounce can diced tomatoes, undrained
  • 3 medium carrots, cut into 1/2-inch-thick slices
  • 2 medium onions, cut into thin wedges
  • 1 large red sweet pepper, cut into 1-inch pieces
  • 1/4 cup kalamata olives, sliced
  • 1/2 cup low sodium vegetable or chicken broth
  • 1/4 teaspoon salt
  • 1/4 teaspoon freshly ground black pepper
  • 6 cloves garlic, minced
  • 1 medium zucchini, halved lengthwise and cut into 1/4-inch-thick slices

For the Polenta:

  • 1 cup quick-cooking/instant polenta
  • 4 ounces soft goat cheese, slightly crumbled
  • 1 Tablespoon unsalted butter
  • Salt and freshly ground pepper, to taste
For Serving (optional):
  • Pesto
  • Fresh basil, chopped
  • Freshly grated parmesan cheese

Instructions:

  1. In a large skillet, cook ground beef until brown. Drain off any extra fat.
  2. In the same skillet, heat olive oil. When heated add onions and bell pepper. Cook about 5 minutes until starting to soften. Add in carrots, zucchini and garlic, along with undrained tomatoes, broth and salt and pepper.
  3. Cover and cook on low-heat until all the vegetables are cooked through and tomato and broth have slightly thickened.
  4. Meanwhile, prepare polenta according to package directions. I recommend using low-sodium vegetable broth for extra flavor. When polenta is almost cooked through, stir in goat cheese and butter.
  5. Spoon polenta into individual serving bowls and top with ragout mixture over polenta. Top individual bowls with pesto and garnish with basil and freshly ground pepper.