Mango Chicken Salad with Blue Cheese Vinaigrette

Mango Chicken Salad with Blue Cheese Vinaigrette

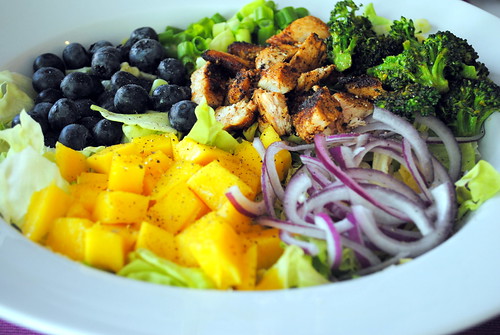
This salad has it all; sweet, salty, cheesy, and all delicious. Mango, blue cheese and broccoli are some of my favorite foods, but never in a million years would I think of combining them. Ever. But somehow, it totally works. The flavor combinations definitely make for a very unique meal.

I definitely plan on making this salad again, but next time I think I might add a couple of other things to make it even better. Adding some toasted cashews or almonds would add a great crunch to the salad. I could also imagine substituting the chicken for shrimp (maybe even coconut shrimp for more of a tropical twist).

Mango Chicken Salad with Blue Cheese Vinaigrette

Mango Chicken Salad with Blue Cheese Vinaigrette
Inspired by Better Homes & Gardens.

For the Vinaigrette:

  • 1/3 cup white-wine vinegar
  • 1 tablespoon Dijon mustard
  • 2 cloves garlic, minced
  • 1/2 cup extra-virgin olive oil
  • 1/2 cup crumbled blue cheese
  • Salt and freshly ground pepper, to taste

For the Salad:

  • 6 cups torn romaine lettuce
  • 2 cups fresh blueberries
  • 1 mango, pitted, peeled, and cut up
  • 12 ounces chicken breast
  • Salt and ground black pepper, to taste
  • 2 Tablespoons unsalted butter or olive oil
  • 3 garlic cloves, minced
  • 2 cups broccoli florets

For the Vinaigrette:

  1. Combine all ingredients in a bowl and whisk together. Season to taste and set aside.

For the Salad:

  1. On a serving platter place romaine lettuce. Top with blueberries and mango; set aside.
  2. Season chicken breast with salt and pepper. In a large skillet cook chicken in 1 tablespoon of the butter with minced garlic over medium heat for 6 to 8 minutes or until no longer pink, turning once. Transfer to a cutting board; slice. Allow to cool slight and arrange atop salad.
  3. In the same skillet cook broccoli in the remaining tablespoon garlic butter over medium heat for 4 to 6 minutes until tender. Place atop salad.
  4. Drizzle salad with blue cheese vinaigrette. If desired, sprinkle with blue cheese.

Cold Rice Noodles with Peanut-Lime Chicken (gluten free!)

Cold Rice Noodles with Peanut-Lime Chicken

My wonderful friend Andrea introduced me to this meal when I was visiting her and her husband in DC last summer. It was love at first bite. She also introduced me to my first food blog (Smitten Kitchen), so I really have a lot to thank her for. This recipe also happens to be from Smitten Kitchen (did everything just come full circle?).

This meal is one of my all-time favorite summer time dishes. The ingredient list and instructions might look a bit long and daunting, but once all the chopping and slicing is finished, it’s pretty easy to get together. I will be quite honest and admit there are a few things in here that I would never be caught eating by themselves (I’m looking at you cucumbers!), but put them all together with some peanut sauce, cilantro, and lime, it’s hard not to like everything in this meal.

Despite my reservations about cucumbers (and bell peppers too), I left the recipe nearly all the same, except for using chicken breasts and all gluten-free ingredients. I also used more cilantro than mint and basil, but that’s just because I love cilantro (I’m lukewarm on basil and barely acquaintances with mint). Luckily, just about everything in this recipe can be adjusted to every individual taste. When you serve this delicious meal up, it’s kind of like a noodle-taco bar scenario. Everything is prepared separately and you get to pick and choose what you do and don’t like, which makes it good for a small crowd. And I am happy to report that this meal is one that gets better with age. The leftovers are even better than the original meal!

Cold Rice Noodles with Peanut-Lime Chicken

Gluten Free Cold Rice Noodles with Peanut-Lime Chicken
Recipe from Smitten Kitchen.

Ingredients

For the Dipping sauce:
  • 6 tablespoons Asian fish sauce
  • 6 tablespoons brown sugar
  • 12 tablespoons lime juice
  • 2 garlic cloves, finely grated or minced
  • Small Thai or Serrano chile, thinly sliced, to taste (jalapeño works too)
For the Peanut dressing:
  • 3 tablespoons Asian fish sauce
  • 3 tablespoons rice vinegar
  • 9 tablespoons lime juice
  • 3 tablespoons soy sauce
  • 1 one-and-a-half inch chunk ginger, peeled and sliced
  • 6 tablespoons natural unsalted peanut butter
  • 1 tablespoon toasted sesame oil
  • Pinch of cayenne
For the Chicken and noodle salad:
  • 1 1/4 pounds boneless skinless chicken thighs (about 6)
  • 8 ounces dried rice vermicelli or other rice noodles
  • 2 small cucumbers, cut in 1/4-inch half moons
  • 2 medium carrots, cut in thin julienne
  • Additional vegetables, as suggested above
  • Small handful basil or mint or cilantro sprigs, or your favorite of the three (torn or roughly chopped)
  • 4 or more scallions, slivered
  • 1/4 cup crushed or chopped roasted peanuts
  • Lime wedges (to serve)

Instructions

Make the dipping sauce:
    1. Whisk ingredients in a small serving bowl, making sure to dissolve the sugar. Leave to ripen for 15 minutes. Refrigerate any extra and use within a few days.
Make the peanut dressing:
    1. In a blender or food processor, puree all ingredients to a smooth sauce, about the thickness of heavy cream. Pour into a serving bowl.
Marinate the chicken:
    1. Stir together 1/2 the dipping sauce and 1/3 the peanut dressing (you can eyeball this) in the bottom of a low-sided bowl or dish. Add the chicken to the mixture and toss to coat. Let marinate at least 15 minutes.
Cook the noodles:
    1. Bring a large pot of water to the boil, then turn off the heat. Add the rice vermicelli and soak for 7 to 8 minutes. (Package directions may vary; check for doneness by tasting.) Drain when noodles are al dente, and cool under running water. Fluff and leave in strainer to drain well.
Cook the chicken:
    1. Grill the chicken on an outdoor grill, a stove-top grill pan, or run under the broiler until nicely browned, about 3 to 4 minutes a side. Let cool slightly, then chop roughly into 3/4-inch pieces.
To serve:
  1. At this point, you can place everything on a large serving platter, with piles or small bowls for noodles, vegetables, chicken, the dressing and marinade and toppings (peanuts, herbs) and let your family and friends put it together in their own bowls as they wish.
  2. Or, you can assemble it for everyone as suggested:Toss vegetables with 1 tablespoon dipping sauce in a small bowl. Divide the cooked noodles among 4 to 6 bowls. Top each bowl equally with vegetable mixture and chopped chicken. Toss each bowl with 2 teaspoons of each the dipping sauce and dressing, or more to taste (we wanted more). Add the herbs, peanuts and scallions to each bowl and serve with additional dressing and dipping sauce on the side.
Gluten Free Barbecue Chicken Taquitos with Avocado Ranch Dip

Gluten Free Barbecue Chicken Taquitos with Avocado Ranch Dip

This recipe is a combination of things I was craving and things I needed to use up. If you have some leftover chicken and tortillas (both are pretty standard leftovers around my kitchen), this is the perfect recipe to use them all up. I really like to make a batch of shredded barbecue chicken to use throughout the week (this is my favorite recipe, but you could easily combine any leftover chicken with bbq sauce). It’s perfect to add to salads or as your meal’s main protein, but I wanted to try something a little different and these taquitos seemed like an easy way to do just that. I was able to get 24 taquitos out of the barbecue chicken recipe I mentioned above (I could have made a couple more but I had already put away the tortillas and cheese), which is a whole lot of taquitos. After a couple dinners and lunches, I froze the leftovers, which defrosted easily in the microwave and I crisped them up again with a few minutes in the oven.

I always bake my taquitos because I just don’t have the patience to fry things. Plus, baking them healthier, you don’t have to stand over a hot pot of oil and it’s less of a mess to clean up, which are all big pluses in my book. I put about two tablespoons of chicken and a sample sprinkling of cheese in each tortilla. I was able to roll them tight enough that they stayed shut when I placed them seam side down on the baking sheet. If you want more filling or are having trouble getting them to stay closed, wooden toothpicks will easily solve that problem.I like my taquitos (and just about everything else) on the crispier side, so while the ends might look a bit burnt, it was really just a combination of caramelized barbecue sauce and cheese.

Gluten Free Barbecue Chicken Taquitos with Avocado Ranch Dip

For the Taquitos

  • Leftover chicken (I recommend this barbecue chicken recipe)
  • Your favorite barbecue sauce
  • 1/2 cup extra sharp cheddar cheese, shredded
  • 24 corn tortillas
For the Avocado Ranch Dip
  • 2 ripe avocados, pitted and cubed
  • 1 cup greek yogurt
  • 3 limes, juiced
  • 1/2 cup fresh cilantro (plus extra for garnish)
  • 2-3 Tablespoons ranch dressing powder
  • 1 teaspoon garlic powder

For the Taquitos

  1. Heat oven to 400. Line two large baking sheets with foil and lightly coat with cooking spray.
  2. Combine chicken and barbecue sauce.
  3. Wrap 12 tortillas in a damp paper towel. Place in microwave and zap for 30 seconds. Flip over and microwave for another 30 seconds. Remove from microwave.
  4. Add around two tablespoons of chicken to one side (almost to the very edge) of a corn tortilla and sprinkle with cheese. Tightly roll the side with the chicken toward the other side of the tortilla and place seam side down on the baking sheet (use wooden toothpicks if they won’t stay together). Repeat until all tortillas are filled and then begin again with the next 12 tortillas until all are filled and rolled.
  5. Place baking sheets in oven and cook 20-25 minutes, or until slightly browned and crispy.
  6. Serve immediately. For your leftovers, I recommend that you let them cool completely and place into large freezer bags and freeze for future dinners and snacks.
For the Avocado Ranch Dip
  1. Combine all ingredients in a food processor and blend until smooth. Add more juice if needed to thin out dip. Garnish with chopped fresh cilantro if desired.

Chicken Bratwurst with Grilled Mango & Red Onion

Chicken Bratwurst with Grilled Mango & Red Onion

Some might say that grilling season ended yesterday (at least in the States), but quite frankly it’s hotter than hell here at the moment. I have no intention of turning on the stove or oven until this heat wave and gross humidity are over and done. There is something more bearable about standing in front of a 400 degree grill on a hot day than dealing with a 400 degree oven.

I usually don’t buy bratwurst because it’s generally made with meats I don’t care to eat, but I’ve found a delicious chicken bratwurst at Von’s/Safeway. It is gluten-free, no strange meats I don’t like, and it’s extremely tasty. It’s Von’s/Safeway’s own Open Nature brand, which is their store brand of  healthy/organic/natural/etc foods.

The grilled mango and red onion really stood out and brought so much extra flavor to the bratwurst. I combined the mango and onion with a teaspoon of oil, a generous dash of cayenne powder and garlic powder and a dash of lime juice. I think this ‘relish’ would have been delicious by itself, but grilling the mango and onion brought out so much flavor and the spice really complemented that. I topped mine with chili sauce just for a little extra flavor. It was the perfect accompaniment.

I made gluten-free buns from Chebe and then toasted them on the grill before topping them with the brats and grilled mango and onions. I have used Chebe for sandwiches and many other things before, but I never as buns. I was pretty impressed by how they held up to both the brat and to the grill.

 Chicken Bratwurst with Grilled Mango & Red Onion
Adapted from Better Homes & Gardens.

Ingredients

  • 1 large fresh mango, seeded, peeled, and halved
  • 1 small red onion, cut in 1/2-inch slices
  • 1 teaspoon oil
  • 1/2 teaspoon cayenne powder
  • 1/2 teaspoon garlic powder
  • 1 lime, juiced
  • 1 package of bratwurst links
  • buns

Instructions

  1. Heat grill to 400 degrees.
  2. Toss mango and onion with oil, cayenne, garlic, and lime juice.
  3. On grill rack place mango halves, onion, and brats directly over flames. Grill for 8-10 minutes, or until mango and brats are browned and cooked through and onion is crisp-tender, turning once halfway through cooking. Lightly toast buns for 1 to 2 minutes on grill. Set aside mango, onion, and brats.
  4. For relish, chop grilled mango and onion. Serve brats in buns with mango and onion.

Slow-Cooker Chicken Chili Tacos

Chicken Chili Tacos

A couple years ago I went to my friend Nancy’s Super Bowl party. We spent the weekend coming up with all kinds of delicious ideas. She decided to make one of the day’s main bites to eat (BBQ pulled pork sandwiches) in the crock pot and just let people serve themselves whenever they wanted. Genius! I don’t eat pork like that, so I didn’t try any, but I liked the idea. I easily could have done BBQ chicken sandwiches here, but tacos are more my style. It would be really easy to prep a taco bar with all the fixings before the big game and allow your and your guests to eat at leisure.

I totally had delicious salsa to put on the tacos, but I totally got distracted by the amazing guacamole. The avocados in these parts are pretty phenomenal at the moment (that and I make delicious guac). Fear not, the salsa will find a home in the leftovers, if it doesn’t meet some tortilla chips first.

Another slow cooker recipe that would be perfect for Super Bowl Sunday, or any day really, I would also recommend my Tri-Tip tacos! They are delicious.

If a taco bar seems like a bit too much work, this recipe could easily be turned into an real chili recipe. You would just have add some more tomatoes/salsa. I would recommend a 15 ounce can of diced tomatoes (look for fire-roasted or chiles) and their juice and a second can of pinto beans (also drained and rinsed).

Slow-Cooker Chicken Chili Tacos
Loosely inspired by Martha Stewart.

  • 2 pounds boneless, skinless chicken breasts or thighs (or a mix)
  • 6-8 garlic cloves, minced
  • 16 ounce jar prepared tomato salsa, plus more for serving
  • 1 large onion, diced
  • 1-16 ounce can pinto beans, rinsed and drained
  • 1-2 Tablespoons canned chipotle chiles in adobo, chopped
  • 1/2 Tablespoon smoked paprika
  • 1/2 Tablespoon Chipotle powder
  • 1 Tablespoon chili powder
  • Kosher salt and ground pepper
  • hard corn taco shells
  • Cilantro, shredded cheese, guacamole, lime wedges, and sour cream, for serving (optional)
  1. In slow cooker, combine chicken, garlic, salsa, onion, chiles, pinto beans, chili/chipotle powder, paprika, 1 teaspoon salt, and teaspoon pepper. Cover; cook on high, 4 hours (or on low, 6 hours).
  2. Transfer chicken to a cutting board, and shred, using two forks. Return shredded chicken to crock pot and stir with juices. Serve in taco shells, with toppings, if desired.

Chicken Spinach & Cauliflower Cheese Pots

Chicken Spinach & Cauliflower Cheese Pots

This is pretty much Chicken Alfredo without any noodles involved. I’m not a pasta fan, so it was pretty much perfect to me. I was a bit hesitant to use evaporated milk. I know it’s real milk with some of the water removed, but shelf stable dairy products just weird me out. Once I got over the canned milk thing, I was really, really impressed by this dish. It was so easy to make and super flavorful. I did add some extra spices by sprinkling the chicken with Kosher salt, black pepper and garlic powder. That definitely helped the dish. Next time, I think the only other thing I would add would be some Dijon mustard. I really think that would have enhanced the flavor even more. And I might add broccoli as well just to add some extra color and vegetables. The spinach was really good in this dish. I thought it might be kind of gross since it was added at the last-minute before baking. This recipe is great as is, but a few easy additions

A quick note about serving: I think it would be easier to do this in one large casserole dish or in 1 cup ramekins. I followed the directions and a 2 cup serving dish was the size of a cereal bowl, which is a lot of food. I think a 1 cup ramekin would be the perfect size accompanied with some extra veggies or a salad.

Chicken Spinach & Cauliflower Cheese Pots


Chicken Spinach & Cauliflower Cheese Pots
Adapted from Taste.Com.Au.

  • 1 small (800g) cauliflower, cut into florets
  • 2 teaspoons olive oil
  • 1 pound/500g boneless, skinless chicken breast, diced
  • Kosher salt, black pepper, garlic powder, for seasoning
  • 3 Tablespoons/40g butter
  • 1/4 cup all-purpose flour (I used Better Batter.)
  • 1 cup low-sodium chicken stock
  • 375ml can evaporated milk
  • 3 ounces/80g baby spinach
  • 1/3 cup grated tasty cheese (I used a sharp English Cheddar)
  1. Preheat oven to 400°F/200°C/180°C fan-forced. Steam over or cook cauliflower in a saucepan of boiling water for 5 minutes or until just tender. Drain.
  2. Heat oil in a large saucepan over medium-high heat. Season diced chicken breast with Kosher salt, black pepper and garlic powder. Add the chicken. Cook, stirring, for 5 minutes or until browned. Transfer to a bowl. Cover to keep warm.
  3. Add butter to pan. Cook for 1 minute or until melted and bubbling. Add flour. Cook, stirring, for 1 minute or until bubbling. Gradually add stock, stirring until smooth. Bring to the boil. Reduce heat to low. Add milk. Simmer for 3 to 5 minutes or until thickened. Remove from heat. Stir in chicken, cauliflower, spinach and 2 tablespoons tasty cheese. Season with salt and pepper.
  4. Spoon mixture into four 2 cup-capacity ovenproof dishes. Sprinkle with remaining cheese. Season with salt and pepper. Bake for 20 minutes or until golden. Serve.

Flattened Chicken with Tomatoes, Olives & Capers

Flattened chicken with tomatoes, olives & capers

This has quickly become one of my go to recipes. I’ve made it several times now and I like it more and more every time. Then again, you could add tomatoes, olives and capers to pretty much anything and I would find it delicious, so I might be a bit biased.

It’s perfect for a quick and easy dinner (like 15 minutes and it’s ready, easy). I’ve made it both with canned diced tomatoes and fresh tomatoes and I hate to say it, but I might have liked the canned tomatoes more… The fresh tomatoes did not break down as well and the skins were kind of tough. I also found that I had to add a little more liquid to get a sauce going with the fresh tomatoes. I am a very saucy person, so when a dish has a sauce, I like a lot of it. If you happen to have super ripe and juicy fresh tomatoes, I wouldn’t worry about it, but if your tomatoes are kind of under ripe and sad, canned would probably be your best bet.

Flattened chicken with tomatoes, olives & capers

Flattened Chicken with Tomatoes, Olives & Capers
Adapted from BBC Good Food.

  • 2 boneless, skinless chicken breast
  • 1/2 cup seasoned flour (I used garlic powder, paprika and black pepper to season)
  • 1 Tablespoon olive oil
  • 1 Tablespoon unsalted butter
  • 1 large ripe tomato, chopped or 1/2-15 ounce can diced tomatoes, drained.
  • 2 Tablespoons capers
  • large handful Kalamata olives, chopped
  • splash white wine/dry vermouth or broth
  1. Place the chicken breast on to a flat surface and cover with plastic wrap. Bash with a rolling pin or mallet to flatten, then lightly coat in the seasoned flour. Heat the oil and butter in a pan, add the chicken and cook for 3-4 mins on each side until crisp, browned and cooked through. Remove from the pan and keep warm.
  2. Add the tomato, capers, olives and wine to the pan, season to taste, then bring to the boil. Bubble the sauce for 2-3 mins until the tomatoes are starting to break down, then spoon over the chicken.

Chicken Taco Casserole

Chicken Taco Casserole

Yes, I am aware it’s Halloween and I should be sharing something themed, but to be quite honest I am not really into Halloween. It’s one day, I don’t get why it now gets a month+ ‘season’ (this also my complaint about christmas). The closest I’m coming to the Halloween spirit is drinking bourbon and reading ‘Helter Skelter‘ (it’s for my book club) all while pretending we aren’t home when trick-or-treaters come by. If that doesn’t say ‘Happy Halloween’, I’m not sure what does…

Enough about things I don’t like, let’s talk about things that I so like: Mexican food. Even in the vaguest sense, Mexican food always makes me happy. This dish is very vaguely Mexican, but tasty enough that we can overlook authenticity. It’s also super easy to throw together. Tasty and easy is definitely a double bonus in my book. I thought about adding in some more vegetables (zucchini or mushrooms maybe), but to cut down on prep/chopping time I decided not to. I thought the end result was very tasty and definitely didn’t seem like it was missing anything, but if I add more time, I would definitely add in some extra veggies as well.

Chicken Taco Casserole

Chicken Taco Casserole
Adapted from Better Homes and Gardens.

  • Nonstick cooking spray
  • 2 large boneless, skinless chicken breasts cut into strips
  • 6-8 cloves garlic, minced
  • 1 teaspoon chili powder
  • 2 teaspoons canola oil
  • 1 large onion, halved and thinly sliced
  • 1-7 ounce can diced green chiles
  • 1-10 ounce package frozen chopped spinach, thawed and squeezed dry
  • 1 1/2 cups salsa
  • 4-6 inches corn tortillas, coarsely torn
  • 3 ounces Monterey Jack or Sharp Cheddar cheese, shredded
  • 1/2 cup cherry tomatoes, quartered or chopped
  • 3 green onions, chopped
  1. Preheat oven to 350 degrees F. Coat an unheated large nonstick skillet with cooking spray. Preheat skillet over medium-high heat. In a medium bowl toss together chicken, garlic, and chili powder. Add to hot skillet. Cook for 4 to 6 minutes or until chicken is no longer pink, stirring frequently. Remove chicken from skillet; set aside.
  2. Add canola oil to skillet. Add onion and green chiles. Cook over medium heat about 5 minutes or until tender, stirring occasionally. Stir in spinach.
  3. Coat a 2-quart square baking dish with cooking spray. Spread about 1/2 cup of the salsa in the baking dish. Top with half of the tortilla pieces, half of the chicken mixture, and half of the vegetable mixture. Pour half of the remaining salsa over the vegetables and top with half of the cheese. Repeat layers once, except do not top with the remaining cheese.
  4. Bake, covered, for 30 to 35 minutes or until heated through. Sprinkle with the remaining cheese. Let stand for 5 minutes before serving. If desired, garnish with cherry tomatoes and green onions.

Chicken Salad

Chicken Salad

The other day I got a craving for chicken salad, which is rather strange considering I have never had it before. The reason I’ve never had it before is that it normally has celery in it. Celery makes me want to cry. I hate it. With a passion. I could probably write you a short novel on my hatred of celery, but I will refrain. The abridged version can be summed up like this: I think celery is pure evil and disgusting and I hate it and it is so gross and will act like a 3-year-old and refuse to eat anything with it in it, on it, or touching it. Ewwwww. Since I am making this chicken salad there will be no celery. Anywhere. Ever.

Once I was able to get the thought of celery out of my mind, I was able to really get into this chicken salad. I am fairly certain using greek yogurt made it a lot better than using all mayonnaise. mayonnaise has a time and a place, but I really enjoyed the tanginess the yogurt had. I did include a bit a mayo to give it a little bit of extra creaminess. The one thing I forgot is that greek yogurt is a lot thicker than mayo. I probably should have added in more lemon juice to thin it out a bit more. Other that that everything was perfect. I really liked the sweetness and texture the grapes and cherries added. The cherries were a last second impulsive add-in. They were just sitting right in front of me when opened the cupboard. They seemed like a good idea at the time and they were. I really liked this as a salad with lettuce. They extra creamy yogurt meant I didn’t need any extra dressing. It made a refreshing and filling lunch. I will say the thing I think that made this salad was the chicken. I used the leftover baked chicken I shared last week. I know I went on and on about how great the fresh herbs were on that chicken.  The fresh herbs really, really made this salad taste amazing.

Chicken Salad

The Best Chicken Salad

  • 2 cups diced chicken
  • 1/3 to 1/2 cup greek yogurt
  • 2 tablespoons mayonnaise
  • 1 cup seedless green grapes, sliced
  • 3 green onions, with some green, thinly sliced
  • 1/2 cup walnut pieces, chopped
  • 1/4 cup dried cherries
  • 1/4 teaspoon salt
  • Dash pepper
  • 1/4 teaspoon garlic powder
  • 1 tablespoon lemon juice
  • Salad greens
  • Sliced avocado
  1. Combine the diced chicken with 1/3 cup yogurt, sour cream, sliced grapes, sliced green onions, walnuts, cherries, salt, pepper, garlic powder, and lemon juice. Stir in the lemon juice. Serve the chicken salad mixture on salad greens and garnish with sliced avocado.

Simple Baked Chicken with Fresh Herbs

Baked Chicken

This is an embarrassingly simple dish. It’s fast and delicious. I was actually kind of shocked by how good the finished product was. The ingredients are very basic, so I was imagining something a bit bland, but that is not at all how it turned out.

Definitely make sure to use fresh herbs! They really make the dish. I used herbs from my garden. I think thyme and sage would also work really well in this dish. It’s pretty much endlessly adaptable. I served this with the delicious roasted onions and mushrooms I shared yesterday. Both dishes require very little preparation and cook for around the same time at the same temperature, so they work perfectly together.

Gorgonzola-Roasted Mushrooms and Onions & Baked Chicken

Simple Baked Chicken with Fresh Herbs

  • cooking spray
  • 1 pound boneless skinless chicken breast
  • 1/2 teaspoon Kosher salt
  • 1/4 teaspoon freshly ground black pepper
  • 1 teaspoon olive oil
  • 2 teaspoons fresh lemon juice, or more to taste
  • 2 teaspoons rosemary, fresh, chopped
  • 2 teaspoons fresh parsley, chopped
  • 1/4 cup low-sodium chicken or vegetable broth
  1. Preheat oven to 400ºF. Coat a small, shallow roasting pan with cooking spray.
  2. Season both sides of chicken with salt and pepper. Transfer chicken to prepared pan and drizzle with oil; sprinkle with lemon juice, rosemary and parsley. Pour broth around chicken to coat bottom of pan.
  3. Bake until chicken is cooked through, about 30 to 35 minutes. Garnish with fresh lemon and serve.