Gluten Free Blueberry-Lemon Ricotta Cheesecake Bars

Gluten Free Blueberry-Lemon Ricotta Cheesecake Bars

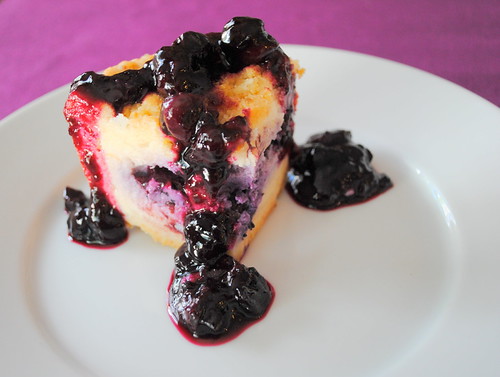
Cheesecake is one of the few desserts I actually go out of my way for. I kind of really love cheesecake. And this cheesecake is delicious. Using ricotta instead of traditional cream cheese really makes the cheesecake seem both rich and creamy, but without the heaviness cheesecakes normally have. I also think that the blueberry and lemon flavors really help keep the cheesecake feeling light and summery almost. I think a fruit centered cheesecake is much more appealing in the summer than something super rich and chocolatey.

Definitely make sure you let these cool overnight! You cannot skimp on the cooling time with these ones. But trust me, it’s totally worth the wait. The blueberry and lemon flavors really, really develop and get nice and friendly together the longer they And since this cheesecake is cut up into bars, it makes a great dessert for picnics, barbecues or when you need a portable dessert (obviously leave the blueberry sauce off to keep it clean and portable!).

Gluten Free Blueberry-Lemon Ricotta Cheesecake Bars
Recipe from Our Best Bites.

Ingredients

Crust and Topping Layers
  • 1/2 cup sugar
  • 1 1/2 cups flour
  • 1/4 teaspoon salt
  • 1/4 teaspoon baking powder
  • 1/2 cup (1 stick) butter, very cold
  • 1 large egg, separated
  • 1 Tablespoon lemon zest
Cheesecake Layer
  • 15 ounce container ricotta
  • 1/2 cup sugar
  • 3 tablespoons flour
  • 1 1/2 teaspoons vanilla extract
  • 2 eggs, plus one egg white
  • 4 tablespoons fresh lemon juice
  • ¾ cup frozen blueberries

Quick Blueberry Sauce

  • 1 ¼ cups frozen blueberries
  • 1 tablespoon lemon juice
  • 1 tablespoon water
  • 3 tablespoons sugar

Instructions

  1. Preheat oven to 350 degrees. Spray an 8×8 baking dish with nonstick spray and set aside.
  2. To prepare crust and topping, combine sugar, flour, salt, and baking powder in a medium sized mixing bowl and stir to combine. Use a large-hole cheese grater to grate butter into flour mixture, or alternately cut butter into small chunks and add to flour mixture. Use clean hands to break up butter and flour mixture until it resembles large crumbs. Add egg yolk from separated egg (reserve egg white for the next step) and add to crumb mixture. Quickly toss to incorporate egg yolk into crumbs. Remove half of crumb mixture (about 1 ½ cups) and lightly press into the bottom of prepared baking dish. Bake for 10 minutes and then remove from oven. Add lemon zest to the remaining crumb mixture, stir to combine, and set aside.
  3. To prepare filling, place ricotta and sugar in a food processor and process until smooth and creamy (about 1-2 minutes), scraping down sides as necessary. Place mixture in a mixing bowl and stir in flour, vanilla, eggs, plus the reserved egg white from the first step, and lemon juice. Whisk to combine and pour mixture over crust in pan. Sprinkle ¾ cup blueberries over the top of filling and then top with the reserved crumb mixture. Bake for 40-50 minutes. Bars should be just golden on top and slightly jiggly in center when shaken. Remove and let cool completely. Cover, and Place in fridge overnight to chill. When ready to serve, slice into bars.
  4. For Sauce: Combine all ingredients. Bring to a simmer and cook for 3-5 minutes, smashing berries with a fork. Cool. Sauce will thicken once cooled and chilled, adjust consistency by adding water until desired consistency is reached.


Gluten Free Baked Churros

Gluten Free Baked Churros

Make these! Make them right now! You need these in your life and you don’t even need to use cinco de mayo as an excuse. these are good enough to any time! I can’t tell you how many years it’s been since I had a churro, but they were one of my favorite childhood treats. The second I bit into one of these gluten free churros, I instantly had delicious memories of fairs and fiestas and trips to Disneyland.

I was actually shocked by this recipe. One, it was so easy! SO easy. And two, so delicious. Like, sugary, buttery, melt in your mouth, you never want to eat anything else every again delicious. I am always a bit wary of attempting to make desserts with French names and since the pastry used to make churros is choux pastry, I wasn’t feeling super confident going in. Luckily, I was proven wrong! choux pastry could not have been easier to make. Plus, baking the churros not only makes them a bit healthier, but takes care of a lot of the mess and work frying causes. 

This recipe made a lot of churros. I got just over 40 mini churros out of this recipe. I was having piping bag issues, so I only made my churros about half the length of the baking sheet, which I think turned out to be the perfect size.

Gluten Free Baked Churros

Gluten Free Baked Churros
Adapted from Sprinkle Bakes.

Ingredients

  • 2 tablespoons light brown sugar, packed
  • 1/2 teaspoon table salt
  • 1/3 cup unsalted butter
  • 1 cup all-purpose gluten free flour (I used Better Batter)
  • 2 large eggs
  • 1 teaspoon vanilla extract
  • 1/4 cup sugar
  • 1 teaspoon ground cinnamon (or to taste)

Instructions

  1. Preheat oven to 425°F. Cover two baking sheets with parchment paper; set aside.
  2. In a medium saucepan, stir together 1 cup water, brown sugar and salt. Add butter and place over medium-high heat. Heat until butter is melted and mixture starts to boil. Remove from heat and add flour, stirring with a wooden spoon. Mixture will clump and pull away from the sides of the pan. Mix/mash with wooden spoon until no streaks of flour can be seen.
  3. In a small bowl, combine eggs and vanilla. Scramble mixture with a fork and then add to the dough-ball in the saucepan. Stir and mash, breaking up the dough until loosened. Stir well until eggs are incorporated and mixture has the appearance of mashed potatoes.
  4. Transfer dough to a piping bag fitted with Wilton star tip #M1. You could also pipe the dough in a zip-top bag with the corner snipped, but the churros will be ridge-less (delicious, nonetheless).
  5. Pipe dough into long thin lengths on the parchment covered pans. Use a pair of kitchen scissors to cut the end of the dough from the piping tip. Leave about 2-inches of space between the churros.
  6. Bake for 10-12 minutes or until slightly puffed. Turn oven to broiler setting and watch carefully as churros toast and turn deep golden brown. Remove from oven and let cool slightly. Transfer to a wire cooling rack. If you’re baking the churros one pan at a time, be sure to return the oven setting to 425°F before putting in the next pan.
  7. Combine sugar and cinnamon and pour onto a long dish. Roll churros in mixture. Serve.

Gluten-Free Cranberry Bread

Gluten-Free Cranberry Bread

I found a sad little bag of leftover frozen cranberries in my freezer the other day. I always freeze cranberries in the fall with the best intentions of using them sometime soon, but they always seem to end up hidden under everything else. I felt bad for these cranberries and wanted them to feel loved, so I baked them into a delicious bread. If baked goods don’t say “love,” I don’t know what does…

This recipe is pretty perfect. It’s fast, simple and delicious. I found the batter to be quite thick and it kind of smothered all my cranberries to the bottom of the baking pan. I will admit I got a little sick of the time it was taking to chop each individual cranberry in half, so I kind of just started hacking them up. Bigger pieces probably would have helped with more uniform berry dispersion. Every slice did have a lot of berries, they were just clumped on the bottom, which is not the worst thing. Next time, I might try substituting some of the milk for orange juice and adding some zest to make a delicious orange cranberry bread.

Gluten-Free Cranberry Bread
Recipe from Gluten Free on a Shoestring.

  • 8 tablespoons unsalted butter, at room temperature
  • 1 cup granulated sugar, plus 1 tablespoon
  • 3 eggs at room temperature
  • 2 1/2 cups all-purpose gluten-free flour (I used Better Batter)
  • 1 teaspoon baking powder
  • 1/2 teaspoon baking soda
  • 3/4 teaspoon kosher salt
  • 10 ounces fresh cranberries, halved
  • 2/3 cup milk, at room temperature
  • 1/4 cup sour cream or plain Greek yogurt, at room temperature
  • Coarse/Raw sugar (like Sugar in the Raw), for sprinkling

Instructions

  1. Preheat your oven to 350°F. Grease well a standard (9-inches x 5-inches or slightly smaller) loaf pan and set it aside.
  2. Beat the butter in a large bowl on medium-high speed until light and fluffy. Add the 1 cup of granulated sugar and the eggs, beating well after each addition.
  3. In a separate, medium-size bowl, place the flour, baking powder, baking soda and salt, and whisk to combine well. Place the cranberry halves in a separate, small bowl, and add a tablespoon of the dry ingredients to the cranberries, along with the remaining tablespoon of granulated sugar, and toss to coat. Set the cranberries aside.
  4. To the large bowl with the butter and sugar mixture, add the dry ingredients, alternating with the milk and sour cream, alternating between the two and beginning and ending with the dry ingredients. The mixture will be thick but smooth. Add the cranberries and reserved sugar and dry ingredients, and mix gently into the batter until evenly distributed throughout.
  5. Scrape the batter into the prepared pan, and smooth the top. It will fill or nearly fill the pan. Sprinkle the top lightly with coarse sugar. Place the pan in the center of the preheated oven and bake, rotating once, until golden brown on top and a toothpick inserted in the center comes out clean (about 1 hour). Remove from the oven and allow to cool in the pan for 20 minutes before transferring to a wire rack to cool completely. Slice thickly and serve.


Gluten Free Runza (or Bierock)

Gluten Free Runza

I am currently enjoying the wonders of Omaha, Nebraska! Whenever I go on a trip somewhere new I like to see what there is to do there and what kinds of food the area is famous for. Before this trip I had only ever hear of Omaha Steaks (which are delicious), but there are all sorts of other culinary delights that are famous in Omaha. Yesterday I shared a gluten-free Reuben salad, which was my take on the famous Reuben sandwich that originated in Omaha. Today I made something that I had never heard of before! A runza!

A runza, which is sometimes called a bierock, came to the Midwest with the German, Russian and Eastern European immigrants that settled there. I was actually surprised by how much I enjoyed the runzas I made. They were delicious. I am partial to Eastern European food, so cabbage, onion and meat can’t really be bad in my book. With the addition of some spices and extra-lean ground turkey (they are traditionally made with ground beef or pork, but that’s not my style) to light it up a little, the end result was a perfect hand held sandwich. If I was the make runzas again (which I just might, because I think they would freeze and keep really well) I would probably add some grainy dijon to the cabbage mix. The flavor was good, but I think mustard would make it perfect. I was a bit short on time this week, so I cheated and rolled out some Chebe dough for my crust, which worked perfectly. I was able to get 8 big runza out of one bread mix. I ended up with a lot of left over cabbage and meat, so next time I might try to make mini ones instead.

Gluten Free Runza


Gluten Free Runza (or Bierock)

Ingredients

For the Filling:
  • 1 Tablespoon olive oil
  • 1 large onion, diced
  • 1 1/4 pounds extra-lean ground turkey
  • garlic powder, to taste
  • onion powder, to taste
  • smoked paprika, to taste
  • salt, to taste
  • freshly ground pepper, to taste
  • 1/2 small head of cabbage shredded (or a bag of cole slaw mix)
For the dough:
  • 1 box of Chebe bread mix, or dough recipe of choice

Instructions

For the Filling:
  1. Heat olive oil in a large pan. When heated add onion and cook until well browned and starting to caramelize. Add turkey and break apart to cook. Add spices and brown the meat.
  2. Add the cabbage and cover pan with lid slightly off to allow steam to escape. Remove lid when cabbage is almost completely cooked and allow excess moisture to evaporate.
  3. When cabbage and meat are both cooked through, remove pan from heat and allow filling to cool slightly.
For the Dough:
  1. Follow instructions on box and when dough is mixed, roll out on flat, well floured surface.
  2. Cut the dough in to 8 pieces that you will be able to fold it into a rectangle.
  3. Place filling in center of each piece and fold together into a rectangle
For the Runzas:
  1. Heat oven to 375. Place folded runzas on a parchment lined baking sheet and bake for 20-25 minutes.
  2. Serve and enjoy!

Super Simple Gluten-Free Chocolate Cake

Gluten Free Chocolate Cake

This is by far the easiest gluten-free dessert I’ve ever made! Almost easier than opening a prepackaged mix. You only need two dishes to make this; a mixing bowl and a baking pan and you are ready to go. Start to finish, your cake will be ready in under 45 minutes!

I tried to cut down on the sugar since 1 cup seemed like a lot. I started adding it 1/4 cup at a time. I’m not sure if it was the cocoa powder or the gluten-free flour, but found that I definitely needed the whole cup. This cake is extremely rich and chocolatey. I ended up freezing about three-quarters of the loaf (I made mine in a loaf pan, not a cake pan). The slice I’ve defrosted since was just as good as the freshly baked. I think making this recipe into cupcakes, might make freezing a bit easier.

Gluten Free Chocolate Cake


Super Simple Gluten-Free Chocolate Cake
From Food.com via FitSugar.

  • 1 1/2 cups gluten-free flour mix (I used Better Batter.)
  • 1/2 cup cocoa
  • 1 cup sugar
  • 1/2 teaspoon salt
  • 2 teaspoons baking soda
  • 3/4 teaspoon guar gum or 3/4 teaspoon xanthan gum (only not included in GF flour mix)
  • 1/2 cup semi-sweet chocolate chips
  • 5 Tablespoons cooking oil
  • 1 Tablespoon vinegar
  • 1 teaspoon pure vanilla extract
  • 1 egg
  • 1 cup water
  1. Heat oven to 350°F
  2. Mix all dry ingredients in a bowl.
  3. Add all liquid ingredients and mix well.
  4. Bake in greased and floured nine-inch square pan (or lined with waxed paper) for 30 to 35 minutes, or until a toothpick inserted comes out clean.
  5. Serve as is or with some berries and cream for extra indulgence.

Summer Fruit Pavlova

Summer Fruit Pavlova

I have to say successfully making this Pavlova was one of my finest moments in the kitchen. I remember thinking Pavlova was the fanciest dessert ever when I was growing up. But for as long as I can remember, the thought of making meringue has scared me. There are too many variables in meringue making and the fact that something can go wrong at any point in the process just stresses me out. I spent quite a bit of time reading old cookbooks and consulting the websites of chefs I trust for learning something new. The end result was a smashing success. I was so proud!

Summer Fruit Pavlova

I made this a bit earlier in the summer for my wonderful mother’s birthday, so depending on where you are peaches and cherries might not be at the peak. As far as  fruit selection goes, you can’t really go wrong. Personally, I would stick to berries and stone fruits, but there are endless combinations that would be delicious.

Summer Fruit Pavlova


Summer Fruit Pavlova

Ingredients

For the Pavlova
  • 4 extra-large egg whites, at room temperature
  • Pinch kosher salt
  • 1 cup sugar
  • 2 teaspoons cornstarch
  • 1 teaspoon white wine or distilled white vinegar
  • 1/2 teaspoon pure vanilla extract
For the Whipped Cream
  • 1 cup heavy whipping cream
  • 1 tablespoon granulated white sugar
  • 1 teaspoon pure vanilla extract
For the Fruit Topping
  • 2-3 cups of mixed berries or fruits of choice.

Instructions

For the Pavlova
  1. Preheat oven to 250°F (130°C) and place rack in center of oven. Line a baking sheet with parchment paper and draw a 7 inch (18 cm) circle on the paper.
  2. Pour the vanilla and vinegar into a small cup. Stir the cornstarch into the sugar in a small bowl.
  3. In a large bowl of a heavy-duty mixer, fitted with whisk attachment, whip egg whites and salt, starting on low, increasing incrementally to medium speed until soft peaks/trails start to become visible, and the egg white bubbles are very small and uniform, approximately 2 to 3 minutes.
  4. Increase speed to medium-high, slowly and gradually sprinkling in the sugar-cornstarch mixture. A few minutes after these dry ingredients are added, slowly pour in the vanilla and vinegar (if you didn’t use cream of tartar.) Increase speed a bit and whip until meringue is glossy, and stiff peaks form when the whisk is lifted, 4 to 5 minutes.
  5. Gently spread the meringue inside the circle drawn on the parchment paper, smoothing the edges, making sure the edges of the meringue are slightly higher than the center. (You want a slight well in the center of the meringue to place the whipped cream and fruit.)
  6. Bake for 1 hour 15 minutes or until the outside is dry and takes on a very pale cream color. Check on meringues at least once during the baking time. If they appear to be taking on color or cracking, reduce temperature 25 degrees, and turn pan around. Turn the oven off, leave the door slightly ajar, and let the meringue cool completely in the oven. (The outside of the meringue will feel firm to the touch, if gently pressed, but as it cools you will get a little cracking and you will see that the inside is soft and marshmallowy.)
For the Whipped Cream
  1. Whip the cream in the clean bowl of an electric mixer fitted with a whisk attachment. When it starts to thicken, add the sugar gradually and then the vanilla, beating the cream until firm. Be careful not to over-do it, or might end up with a bowl of sweet homemade butter.
Assembling
  1. Invert the meringue disk onto a plate and spread the top completely with sweetened whipped cream. Spoon the fruit carefully into the middle of the Pavlova, leaving a border of cream and meringue.

Gluten Free Brownies for 4th of July & a GIVEAWAY!

Betty Crocker Gluten Free Brownies

Life gets really busy sometimes. Between school, finals, trips (SF and DC, so fun), sick dogs, computers dying, volunteering and more school, something had to give. Unfortunately that thing was blogging. I’ve still been cooking and photographing and going to farmers’ market every weekend, but there just don’t seem to be enough hours in the day for getting around to writing and editing.

I really don’t want to talk about how it is July in a week, but considering one of my favorite holidays is on the 4th of July, I suppose we must. Just because life is super busy, doesn’t mean I don’t want to cook and bake as much as I normally would.  Sometimes everyone could use a little help in the kitchen. I have used Betty Crocker gluten free mixes before and I have to say I love them. I’ve used tried the yellow cake mix, the devil’s food cake and now the brownie mix. They have turned out perfectly every single time.

MyBlogSpark sent me an awesome baking tool set with a rolling pin, pastry brush, spatula, and timer, and an 8″ Square Cake Pan. The rolling pin, brush and spatula are all my favorite color, so I was pretty excited about that as well. I got even more excited when I noticed the pastry brush and spatula have a built in rest! No more goopy batter on the counters! Genius!  The best part of this My Blog Spark campaign for General Mills, is that I get to give away the same gift set to one of my readers! This gift set includes products from  Joseph Joseph.  One lucky winner will receive an adjustable wooden rolling pin, spatula, pastry brush, timer, and baking pan. And since I love a good giveaway, I’m also including an apron and a box of Betty Crocker gluten free mix to break in your new pan. See entry details below!

Betty Crocker Gluten Free Brownies

Enter the giveaway here:a Rafflecopter giveaway Giveaway info:

  • To enter, use a Rafflecopter giveaway (it’s super easy!)
  • Winner will be selected via Rafflecopter.
  • The giveaway will close Monday, July 1 at midnight (Pacific Standard Time).
  • Giveaway open to US residents only. (Sorry international readers!)

Disclosure: The information and prize pack have been provided by General Mills through MyBlogSpark. All thoughts and opinions are my own.

Good luck! 🙂

Betty Crocker Gluten Free Brownies


Gluten Free Brownies for 4th of July
Recipe from Betty Crocker.

  • 1 box Betty Crocker® Gluten Free brownie mix
  • Butter and eggs called for on brownie mix box
  • 1 package (8 oz) cream cheese, softened
  • 1/3 cup sugar
  • 1/2 teaspoon vanilla
  • 3-4 cups mixed fresh red and blue berries (strawberries, raspberries, blueberries, blackberries)

Instructions

  1. Heat oven to 350°F (or 325°F for dark or nonstick pan). Grease bottom only of 8X8 baking pan with cooking spray.
  2. In large bowl, stir brownie mix, butter and eggs until well blended. Spread in pan.
  3. Bake 28-31 minutes or until toothpick inserted into middle of pan comes out clean or almost clean. Cool completely, about 1 hour.
  4. In small bowl, beat cream cheese, sugar and vanilla with electric mixer on medium speed until smooth. Spread mixture evenly over brownie base. Arrange berries over cream cheese mixture. Refrigerate about 1 hour or until chilled. Cut into squares. Store covered in refrigerator.


Gluten-Free Cream Cheese Coffee Cake

Gluten-Free Cheese-Filled Coffee Cake

I’m really not one for cakes (cheesecake is the one exception, but that’s totally different). But I have to admit, every once in a blue moon there is nothing better than a huge cup of coffee and a slice of coffee cake. I absolutely loved this recipe. I actually only made it because I had all the ingredients on hand, but it was so simple and quick to get together. Perfect for a quick breakfast sweet or an easy last-minute tea/coffee date.

I have to say that this coffee cake is definitely at its best straight from the oven. Despite wrapping  the cake up nice and tight, the next day it was close to rock solid the next day. That’s just the way gluten-free flours tend to be. A quick 10, 15 seconds in the microwave and the problem was solved.

Gluten-Free Cheese-Filled Coffee Cake

Gluten-Free Cream Cheese Coffee Cake
Recipe from Celiac Central.

Ingredients

For the Cream Cheese Filling:
  • 8 ounces cream cheese – room temperature
  • ¼ cup granulated sugar
  • ½ teaspoon lemon juice
For the Cake:
  • 1 ½ cups Gluten-Free Bisquick
  • 2 large eggs
  • 1/3 cup milk
  • ¼ cup butter – softened
  • 1 teaspoon pure vanilla extract
  • 1/3 cup granulated sugar
For the Crumb Topping:
  • ¼ cup light brown sugar
  • ¼ cup softened butter – room temp
  • 1/3 cup all-purpose gluten-free flour blend (Bob’s Red Mill is fine.)

Instructions

  1. Preheat the oven to 375 degrees. Generously grease a round 9 in. cake pan and set it aside.
  2. Mix the cream cheese filling in a small bowl and set aside.
  3. In a large bowl, mix the butter, milk, eggs, vanilla and sugar. Gradually add the flour and mix until well combined.
  4. Spread about a little more than half of the batter in the bottom of the pan. Next put the cream cheese filling on top and try to spread around. (It may be difficult, but using the back of a tablespoon works well.)
  5. Lastly, put the remainder of the dough batter on top.
  6. In a small bowl, using a pastry blender tool or 2 forks, combine the topping ingredients until it resembles crumbs. Sprinkle over the batter in the pan.
  7. Bake for about 20-25 minutes (I would start checking it around 20). Insert a tooth pick into the cake and it should come out clean and dry when done.
  8. Cool well before dusting the top with sifted confectioner’s sugar, if you like. After cooling, be sure to keep covered for freshness.

Gluten-Free Salted Caramel Mocha Bundt Cakes

Gluten-Free Salted Caramel Mocha Bundt CakesSo I guess now that Thanksgiving has come and gone here in the States, I guess that means the holiday season is officially upon. I must admit I am a bit of Grinch. Mainly because I think christmas has just gotten far too out of hand. There is only one thing that I absolutely adore about the holiday season and that’s the obscene amount of baking that I can do. It’s the one time of the year that mass quantities of baking are socially acceptable.

I’ve already started thinking of fun and new recipes I can start testing out on my friends and family. It’s great having a willing and able built-in test audience, especially since I’m not too keen on sweets. I light of my mini dessert obsession this recipe seemed like the perfect combination of experiment and great taste. I really wanted to try out my new mini bundt pan (how fun is the word ‘bundt’?). I’m not sure if it was me, the recipe, the oven or the pan, but it was rough going when things came out of the oven. Luckily, after a bit of coaxing, everyone got their act together and cooperated in the end. The salted caramel flavor made this chocolate cake even richer. Add in the frosting and it was one of the sweetest and richest desserts I have ever come across. I decided to sprinkle on a bit of flakey sea salt to enhance the caramel flavor and cut the sweetness just a bit.

Gluten-Free Salted Caramel Mocha Bundt Cakes

Gluten-Free Salted Caramel Mocha Bundt Cakes

For the Cake

    • 2 cups Better Batter all-purpose gluten-free flour
    • ¾ cup unsweetened natural cocoa powder
    • 1¼ teaspoon baking soda
    • ¾ teaspoon kosher salt
    • 1½ cups packed light brown sugar
    • 1 stick unsalted butter, at room temperature
    • ½ cup sour cream, at room temperature
    • 2 extra-large eggs at room temperature, beaten
    • 1 teaspoon pure vanilla extract
    • 1 cups International Delight Salted Caramel Mocha Flavor
For Frosting
  • 1/2 cup powdered sugar, sifted
  • 2 Tablespoons International Delight Salted Caramel Mocha Flavor

For the Frosting

    1. Mix powdered sugar with International Delight. Beat with electric mixer on low. If the mixture is too thick for frosting, add in more International Delight. If it is too thin, add in more powdered sugar.
For the Cake
    1. Preheat your oven to 325 degrees F. Grease mini bundt pan or baking pan of choice.
    2. In a large bowl, place the flour, cocoa powder, baking soda, salt and brown sugar, and whisk to combine well. Add the butter, sour cream, eggs, vanilla and International Delight, and mix to combine well. The batter will be thickly pourable.
    3. Fill the wells of the pan. about halfway full with batter. Shake from side to side to distribute the batter in an even layer. Place in the center of the preheated oven, and bake until a toothpick inserted in the center comes out clean, about 20 minutes. The cake should be a little spongy, not dense.
    4. Remove the pan from the oven and allow to cool for at least 10 minutes in the pan. Transfer to a wire rack to cool completely.
    5. Place one mini cake on a piece of parchment paper, bottom side down. Drizzle a generous amount of frosting on top of the cake.

The International Delight Facebook page shares coupon savings and a chance to share your delight this holiday season.


This is a sponsored conversation written by me on behalf of International Delight. The opinions and text are all mine.

Pear & Cranberry Dutch Baby Pancake

Pear & Cranberry Dutch Baby Pancake

So, it’s Thanksgiving tomorrow here in the States. The last thing over everyone’s minds is probably breakfast. Breakfast is the most important meal of the day, so it shouldn’t be overlooked just because the main event is later in the day. I’ve the hard way over cooking several Thanksgiving dinners to know that a hungry chef is a cranky chef. Take a quick break this morning and make a delicious breakfast to get you through the day. I have to admit, my cooking time was over 30 minutes (more like 35 than 25), so not the world’s quickest breakfast. I’m going to write that off the increased baking time to the gluten-free flour, which is temperamental at best.

This was the first time I ever had or made a Dutch baby pancake and I have to say that it lived up to the hype. I would highly recommend this for special breakfast or a delicious brunch.

Pear & Cranberry Dutch Baby Pancake

Pear & Cranberry Dutch Baby Pancake
Adapted from Williams-Somona.

  • 3 Bartlett or D’Anjou pears, peeled, cored and cut into 1/4-inch slices
  • 3/4 cup fresh or thawed frozen cranberries
  • 1/4 cup plus 1 Tablespoon granulated sugar
  • 1/4 tsp. ground cinnamon
  • 5 Tablespoons unsalted butter
  • 3 eggs
  • 3/4 cup all-purpose flour (I used Better Batter.)
  • 1/4 tsp. salt
  • 3/4 cup milk
  • Confectioners’ sugar for dusting
  • Maple syrup for serving
  1. In a bowl, stir together the pears, cranberries, the 1/4 cup granulated sugar and the cinnamon. In a 9-inch French skillet over medium heat, melt 2 Tablespoons of the butter. Add the apple mixture and sauté until the pears are tender and the cranberries have broken down, about 8-12 minutes. Remove from the heat.
  2. Put an 11-inch French skillet or ovenproof sauté pan in a cold oven. Preheat the oven to 400°F.
  3. Meanwhile, put the eggs in a blender and blend on medium speed until very frothy, about 1 minute. Add the flour, salt, the 1 Tablespoon granulated sugar and the milk and blend on medium speed for 2 minutes, stopping the blender to scrape down the sides as needed.
  4. When the oven is preheated, put the remaining 3 Tablespoons butter in the hot skillet and return it to the oven until the butter melts; do not let it brown. Carefully pour the batter into the hot skillet, then distribute the pear-cranberry mixture evenly on top. Bake until the Dutch baby is lightly browned and the sides have risen, about 25 minutes.
  5. Remove the skillet from the oven, dust the Dutch baby with confectioners’ sugar and serve immediately with maple syrup. Serves 4 to 6.