Gluten Free Green Chile & Mushroom Goat Cheese Queso

Chile & Mushroom Goat Cheese Queso

Last weekend I popped up to San Francisco for a quick visit with friends and my blog and computer decided they wanted a vacation too. Technical problems seem to be resolved for the most part, so let’s get back to it. Cinco de mayo is rapidly approaching and since I like any excuse to eat Mexican food, I plan on taking full advantage of the fact this week. Most of these recipes aren’t super traditional or exactly authentic, but they are delicious enough for any fiesta.

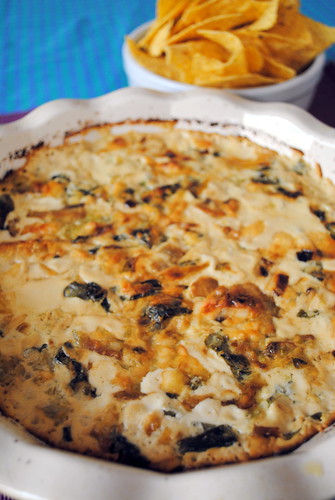
 This queso is super tasty. I added some of my favorite spring ingredients (mushrooms, leeks and spinach) and they really added a lot of flavor to the queso. They mushrooms added a great earthy flavor, which worked really well with the tangy goat cheese. I served my queso with tortilla chips, but it would also go well with veggies, crackers or bread.

My oven, like all the other machines in my life, has also been a bit temperamental lately (had to get the igniter replaced… again…), which has changed my oven’s personality somewhat. It seems to be cooking a bit lower or slower (I’m still trying to figure it out).  After 25 minutes the queso was definitely bubbly and ready to serve, but there was absolutely no color to the top of it, which made it look like a blob of boring, white cheese. It’s not a requirement, but I like a little bit of a brown crust on my baked dips. It took me at least 35 minutes to get any type of color to the dip and as you can see in the picture it still came out a bit splotchy. Despite my odd requirements for baked dip coloration, the end product was delicious.

Gluten Free Green Chile & Mushroom Goat Cheese Queso
Adapted from Whole Foods.

  • 2 teaspoons extra virgin olive oil
  • 1/2 pound mixed mushrooms, thinly sliced
  • 6 ounces goat cheese, crumbled
  • 6 ounces shredded Monterey Jack cheese (about 1 3/4 cups)
  • 1 1/2 cup sliced baby spinach leaves
  • 1 large leek, cleaned and thinly sliced
  • 1/2 cup diced red onion
  • 1 (10 ounce) can green chiles, diced (chop finely if using whole chiles)
  1. Preheat oven to 375°F. In a large skillet, heat oil over medium heat. Add leeks and onion cook until softened and starting to brown, about 10-15 minutes. Add mushrooms and cook, stirring frequently, until mushrooms have released their liquid and are dry and lightly browned, about 10 minutes. Add chopped spinach and cook until just beginning to wilt, about 1 minute. Spread leeks, mushrooms, spinach over the bottom of a small ovenproof casserole or gratin dish. In a large bowl, combine goat cheese, Jack cheese, and chiles and mix until combined. Spread cheese mixture evenly over mushrooms and bake until bubbling, about 25-35 minutes. Serve hot.
Prosciutto & Goat Cheese Wrapped Asparagus

A little Monday evening aperitivo.

My girlfriend Kelly made this absolutely amazing asparagus appetizers (I love alliteration!) for our last book club meeting. They were delicious! And so simple. I made them at home for a little Monday evening aperitivo. These are definitely a great bite for a last-minute wine and cheese party and definitely worthy of sharing with guest. Next time I have a dinner party, these will be on the menu. I’m actually kind of looking for any excuse to make these again.

You can use any soft, spreadable cheese. I would avoid cream cheese, but any other soft cheese should work. I think Boursin would be amazing.

Making this appetizer into a side dish would be very easy to do. I would leave the prosciutto slice whole and wrap it around 3-5 pieces of asparagus and cook them the same way (maybe a minute or  two longer). I think it would make for a really tasty side dish, but I really like how the individual spears of asparagus and prosciutto get super crispy.

Prosciutto & Goat Cheese Wrapped Asparagus


Prosciutto & Goat Cheese Wrapped Asparagus

Ingredients

  • Asparagus spears, washed and trimmed
  • Soft goat cheese, at room temperature
  • Prosciutto, each slice cut into 3 pieces

Instructions

  1. Pre-heat the oven to 400F degrees.
  2. Spread the goat cheese on each slice of prosciutto.
  3. Wrap each asparagus spear in a 1/3 slice of prosciutto and goat cheese.
  4. Bake for 6-8 minutes, until warm and starting to crisp.
  5. Serve and become the hit of the party!

Fromage Fort

Hi Fromage Fort, I'm your newest fan. #cheeseoverload

I doesn’t look like much, but I cannot even begin to put into words how amazing this is. Amazing! That’s all I can say. I was faced with the awkward situation of having a whole bunch of cheese, but not enough to make a legitimate cheese plate. You know that awkward spot where you’ve had a wine and cheese night and there is some cheese leftover, but not really anything worthwhile. It’s always a dark day. There are just tiny bits of that, something with a bit of a rind, some soft stuff that was kind of sad looking, a tad of blue begging to find a second chance. I poked around the internet for a bit and thanks to the magic of Google, I discovered the most glorious way to  save the cheese! Fromage Fort! You can’t really go wrong with the combination of cheese. I used some blue, Boursin, goat, brie and parm. Delicious.

Serving wise, baguette, crackers, even some crudités would be great to serve with this. I used toasted gluten-free bread. If I had been by myself, I probably would have just used a spoon.

Final word of advice, get on this. Stat!

Fromage Fort
Adapted from Smitten Kitchen

Ingredients

  • 1 pound mix leftover cheese, harder cheeses grated, softer ones cut into chunks
  • A couple pats of butter, if using mostly firm cheese varieties
  • 1-3 small clove garlic, minced, or more to taste
  • 1/2 to 1 cup leftover white wine
  • 1 to 2 tablespoons finely chopped fresh herbs, such as parsley, thyme, rosemary or chives
  • Salt and freshly ground black pepper to taste

Instructions

  1. Blend cheese, butter (if using) and garlic in food processer until combined. Drizzle in wine with the motor running until you get your desired consistency — some like it completely smooth, others prefer chunks. Add herbs, pulsing the machine until just combined. Season to taste with salt and pepper.
  2. Fromage fort can be used right away, or kept in the fridge until needed. In the fridge, it will thicken and age a little; the flavors will mingle and deepen. Let sit out for a few minutes to slight soften and make serving easier.


Grilled Pineapple & Goat Cheese Quesadillas & More Cinco de Mayo Treats!

Grilled Pineapple & Goat Cheese Quesadillas

This is a great last-minute appetizer for an Cinco de Mayo. It’s super easy to make if you already have the grill going or you can cheat (like I did) and use a ridged grill pan in the kitchen

I’m a big proponent of putting my favorite foods and ingredients together and just hoping for the best. Pineapple is my all-time favorite fruit. I really enjoy goat cheese as well. Put the two together and yum. I used this amazing goat cheese from Trader Joe’s that had kalamata olives in it . I also really love olives, so I thought it was fantastic. The sweet, caramelized pineapple went really well with the tangy goat cheese and the little bits of kalamata gave the whole thing a little bit of saltiness.

Grilled Pineapple & Goat Cheese Quesadillas

Grilled Pineapple & Goat Cheese Quesadillas

  • sliced fresh pineapple (in rings)
  • softened goat cheese
  • corn tortillas
  1. Heat the grill to high or grill pan over medium-high heat. Place pineapple rings on the grill. Allow to cook for about 4 minutes until there are visible grill lines on the fruit then flip and grill the other side. Remove from heat when done.
  2. One side of a tortilla spread the soften goat cheese in a thin layer to cover the tortillas. Place the pineapple on top and cover with an other tortilla. Place the tortilla directly on the grill or in the grill pan and cook until there are visible grill lines. Flip the tortillas and grill the other side.
  3. Serve and enjoy!
Last minute Cinco de Mayo recipes!

Portobello Mushrooms Stuffed with Goat Cheese, Tomatoes and Bacon

So a couple days ago, I was attempting to figure out what to make for lunch. I was at a total loss. I had some great ingredients on hand, but nothing really came together off the top of my head. A few minutes of googling later, I stumbled across this recipe. Definitely found a winner. 


I love mushrooms. I actually kind of love every ingredient in this recipe (except maybe bacon. I’m not really that into bacon I think.) Portobellos are particularly great. You can used them for appetizers, fries and they also make a great base for a dish. I am pretty sure I will be making this again in the future and I actually think I would leave the bacon out since there were already so many flavors going on. I think it would make a great vegetarian meal without the bacon and you could even use the same filling in smaller mushrooms for an appetizer. 

Portobello Mushrooms Stuffed with Goat Cheese, Tomatoes and Bacon (from this recipe)

  • 3 tablespoons of extra virgin olive oil
  • 3 tablespoons balsamic vinegar
  • 3 portobello mushrooms caps, with stems removed
  • Salt and pepper
  • 1/2 red onion, chopped
  • 1/3 cup of crumbled goat cheese
  • 1 whole tomato, diced
  • 3 slices bacon, fully-cooked and crumbled
  • 1/4 teaspoon freshly chopped basil
  1. Preheat oven to 350 degrees. Prepare a baking dish by covering it with aluminum foil.
  2. Whisk together the olive oil and balsamic vinegar in a small bowl. Brush the mixture on the aluminum foil and then brush the mixture on the tops and bottoms of the mushrooms caps. Sprinkle the caps with salt and pepper and then set them, gill side down, on the baking dish.
  3. Pour 1 tablespoon of the oil and vinegar mixture in a saucepan and saute the onion until it becomes translucent.
  4. Place baking dish in the oven and bake the caps for about 5 minutes. After 5 minutes, flip the mushroom caps and continue to bake for 5 minutes. Remove the mushroom caps from the oven.
  5. Fill each of the mushrooms caps with goat cheese, tomato, onion and bacon. Sprinkle with salt, pepper and basil.
  6. Place in the oven for 7 minutes, wait for the cheese to crisp up a bit and serve warm. Or you can turn on the broiler to get the cheese nice and brown, but watch it like a hawk making sure it doesn’t burn!
  7. Serve and enjoy.