Gluten-Free Pizza Bianca with Caramelized Onions, Goat Cheese, and Spinach

Pizza Bianca with Caramelized Onions & Spinach

A while ago I read about Pillsbury coming out with a line of gluten-free doughs. As much as I love making my own doughs, I wanted to test out the doughs and see how they held up to my own. My first test was with their thin crust pizza dough. It’s hard to find a good gluten free thin crust pizza and I’ve yet to find a gluten-free one that is on par with gluten filled dough.

Straight out of the oven, the crust was great. Super thin and crunchy. I have never had a gluten-free pizza crust get this crispy before. After a few minutes, the quality of the crust went down hill. The pizza turned rock hard, almost to the point of being too hard to even eat. With the leftovers, it was probably the one time I was happy to zap the pizza in the microwave so the crust would soften up a bit. This was my first time using this dough, so it could be entirely my fault for rolling it out too thin. I will definitely buy the dough again in the future because the convenience is nice, but I might leave the dough a bit thicker next time and see how it fares.

The toppings on the pizza were absolutely delicious. This was more of a ‘clean out the fridge’ kind of meal than a planned recipe, but it made for a great lunch. The caramelized onions can be a time consuming addition to the pizza, but caramelized onions make everything better so I think they are worth the effort. I wanted to get a bit more color on the goat cheese, but as you can see the crust was already quite brown, so I decided not to risk burning it.

Disclaimer – I wasn’t compensated in any way for this post. I just like trying out new to me products and thought I would pass along my thoughts.

Gluten-Free Pizza Bianca with Caramelized Onions, Goat Cheese, and Spinach

Ingredients

  • 1 container of Pillsbury Gluten Free Pizza Dough (or pizza dough of choice)
  • 1 Tablespoon extra-virgin olive oil, divided
  • 3 large garlic cloves, minced
  • 1/2 cup grated mozzarella
  • 1 large onion, thinly sliced into half moons
  • 2 cups baby spinach
  • 1/2 a log of goat cheese, cut into slices

Instructions

  1. In a large skillet, heat 1/2 Tablespoon of oil over medium-high and add onion when oil is heated. Stir to coat onion with oil and allow onion to cook for 10 minutes. Reduce heat to low, sprinkle in a bit of salt, stir again and allow onions to continue darkening and caramelizing stirring every 10 minutes or so, until desired color has been reached. Remove from oil.
  2. Add spinach to remaining oil in the skillet and sauté until slightly wilted, then remove from skillet.
  3. Heat oven to 400°F. Grease cookie sheet and hands. Press dough into 11-inch round on cookie sheet.
  4. Sprinkle the minced garlic over the dough and lightly brush with half the olive oil. Bake 12 to 14 minutes or until edge is beginning to brown.
  5. Sprinkle mozzarella over the crust, top with onions and spinach and goat cheese slices.
  6. Return crust to the oven and bake 8 to 10 minutes longer or until crust is deep golden brown and cheese is melted. Top with basil leaves. Cool 5 minutes before serving.

Halloumi, Snap Pea & Tomato Quinoa Salad

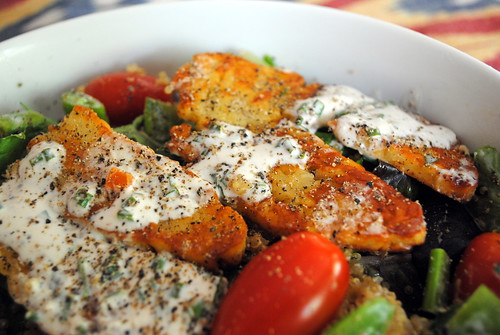
Halloumi, Snap Pea, Tomato & Quinoa Salad

I’ve been on a bit of a halloumi kick lately. Normally I would feel bad about sharing recipes with ‘exotic’ ingredients in them, like halloumi, but now that Trader Joe’s now sells this amazing cheese, I would hardly count it as exotic anymore.

This salad is not only quick and easy to make, it is delicious too. The snap peas and tomatoes around here are absolutely delicious at the moment. Their sweetness combined with the salty halloumi help makes every bite delicious. The dressing is light and flavorful. It really adds to the salad and helps all the delicious flavors come together.

Halloumi, Snap Pea, Tomato & Quinoa Salad


Halloumi, Snap Pea & Tomato Quinoa Salad

For the Dressing:
  • 4 Tablespoons plain Greek yogurt
  • 2 Tablespoons lemon juice
  • 1/2 Tablespoon fresh parsley, minced
  • 1/2 Tablespoon fresh basil, minced
  • 1/2 Tablespoon fresh chives, minced
For the Salad:
  • 2 teaspoons olive oil
  • 1 pack Halloumi, cut into slices
  • 1/2 pound cherry tomatoes
  • 4 ounces snap peas, cut into pieces
  • 12 ounces mixed spring greens
  • 2 cups cooked quinoa
  1. Combine all ingredients for the dressing in a small bowl. Mix to combine and set aside.
  2. In a large pan heat the olive oil over medium-high heat. When oil is hot, add halloumi and cooked until golden brown, about 2-3 minutes. Flip and repeat on the other side. Place cooked halloumi on paper towels to drain excess oil.
  3. In a large bowl, combine greens, snap peas and tomatoes and about half the dressing. Toss to mix all the ingredients.
  4. Divide between 4 serving bowls. Top with about 1/2 cup of the cooked quinoa and 2-3 slices of the halloumi and serve.


Gluten Free Drunken Shrimp with Veggie Fried Rice

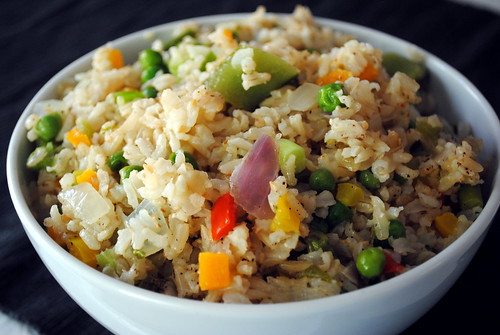
Drunken Shrimp with Veggie Fried RIce

Sticking with this week’s loosely Asian inspired theme, this is a fairly quick , easy and very delicious recipe.

The shrimp stir-fry makes for a quick meal and is great for a weeknight meal. These shrimp are absolutely delicious. I thought the shrimp and their sauce was the perfect topping for the fried rice, but noodles or even a salad could work just as well. I used this recipe to clean out my vegetable door. I just used whatever I had on hand, but you can use any veggies you want.

Veggie Fried Rice

Gluten Free Drunken Shrimp with Veggie Fried Rice
Shrimp adapted from this recipe from Chow.

Ingredients

For the Rice:
  • 2 Tablespoons sesame oil
  • 1 large onion (I used 1/2 red and 1/2 white to clean out the fridge)
  • 3 garlic cloves, minced
  • 2 carrots, peeled and diced
  • 1/2 red bell pepper, diced
  • 1/2 green bell pepper, diced
  • 1/2 cup frozen peas, defrosted
  • 10 green beans or snap peas, chopped
  • 2 cups cooked brown rice
  • 2-3 Tablespoons gluten-free Tamari
  • 1 Tablespoon rice vinegar
  • 3 green onions, finely sliced
  • 1/2 teaspoon toasted sesames
For the Shrimp:
  • 3 Tablespoons low-sodium gluten-free Tamari sauce
  • 4 garlic cloves, minced
  • 1 jalapeño pepper, stemmed (seeded if you don’t like spice) and thinly sliced
  • 2 Tablespoons cilantro, finely chopped
  • 1 lime, juiced
  • 1 Tablespoon olive oil
  • 12 jumbo shrimp, peeled and deveined
  • 1 lemongrass stalk, tough outer layer removed and cut into 4 pieces
  • 1/4 cup vodka

Instructions

For the Rice:
  1. Preheat a large skillet or wok to medium heat. Add sesame oil. When oil is heated onion, garlic, bell peppers, peas and carrots and sauté until tender.
  2. Add the rice to the veggie mixture. Pour the soy sauce on top. Stir and fry the rice and veggie mixture until heated through and combined. Top chopped green onions and sesame seeds and serve.
For the Shrimp:
  1. Place the soy sauce, garlic, jalapeños, cilantro, lime juice, oil, and sugar in a shallow dish and stir to combine. Add the shrimp and lemongrass and stir to coat. Let marinate for 10 minutes at room temperature.
  2. Heat a large frying pan over high heat until hot, about 3 minutes. Add the shrimp mixture and cook until the shrimp are bright pink, about 3 minutes. Remove from heat and carefully add the vodka. Return the pan to high heat and cook for 1 minute more or until the alcohol smell has dissipated. Remove the lemongrass pieces and serve the shrimp and sauce over rice.

Easy Vegetable Frittata

Easy Vegetable Frittata

This week I am sharing some of favorite brunch recipes. I absolutely love brunch and summer weekends seem to just demand them. These recipes don’t demand too much cook and can mostly be prepared ahead to time, which gives you more time to relax, enjoy your weekend and enjoy some extra mimosas with your friends.

This frittata is pretty much perfect if you ask me. It’s easy to make, it can help you clean out your vegetable drawer and it reheats wonderfully. I just used the vegetables I had on hand, but you can add just about anything you want to this frittata. Broccoli, bell peppers, jalapeños or fresh herbs, like basil or chives, would all be great additions.

Easy Vegetable Frittata

Ingredients

  • 1 Tablespoons olive oil
  • 1 onion, diced
  • 1 bunch green onions, chopped
  • 2+ cloves garlic, minced
  • 6+ large mushrooms, cleaned and sliced
  • 1 tomatoes, chopped with seeds removed
  • 1 cup baby spinach, roughly torn or chopped
  • 1 cup shredded cheese (I used extra sharp cheddar)
  • 6 large eggs
  • salt and freshly ground black pepper, to taste

Instructions

  1. Heat the oven to 375 degrees F. Grease a baking dish (I used a 9 inch pie dish).
  2. Heat 1 tablespoon olive oil in a large skillet over medium heat. Add the onions and sauté until beginning to brown. Then add the green onions, mushrooms and garlic and cook until mushrooms begin to soften, about 5 minutes. Add tomatoes and spinach. Sauté for an additional 1 to 2 minutes or just until the spinach is wilted. Season the vegetables with salt and pepper.
  3. In a medium bowl, beat together the eggs, cheese, salt, and pepper.
  4. Finish cooking in the oven for 25-35 minutes, until the eggs have completely set in the center.

Gluten Free Baked Churros

Gluten Free Baked Churros

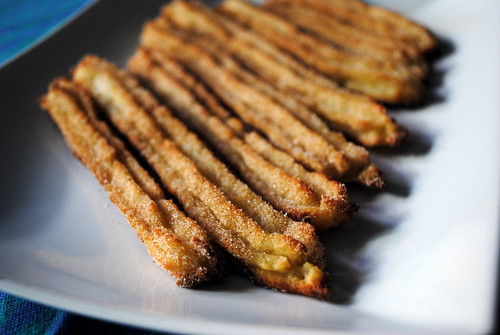
Make these! Make them right now! You need these in your life and you don’t even need to use cinco de mayo as an excuse. these are good enough to any time! I can’t tell you how many years it’s been since I had a churro, but they were one of my favorite childhood treats. The second I bit into one of these gluten free churros, I instantly had delicious memories of fairs and fiestas and trips to Disneyland.

I was actually shocked by this recipe. One, it was so easy! SO easy. And two, so delicious. Like, sugary, buttery, melt in your mouth, you never want to eat anything else every again delicious. I am always a bit wary of attempting to make desserts with French names and since the pastry used to make churros is choux pastry, I wasn’t feeling super confident going in. Luckily, I was proven wrong! choux pastry could not have been easier to make. Plus, baking the churros not only makes them a bit healthier, but takes care of a lot of the mess and work frying causes. 

This recipe made a lot of churros. I got just over 40 mini churros out of this recipe. I was having piping bag issues, so I only made my churros about half the length of the baking sheet, which I think turned out to be the perfect size.

Gluten Free Baked Churros

Gluten Free Baked Churros
Adapted from Sprinkle Bakes.

Ingredients

  • 2 tablespoons light brown sugar, packed
  • 1/2 teaspoon table salt
  • 1/3 cup unsalted butter
  • 1 cup all-purpose gluten free flour (I used Better Batter)
  • 2 large eggs
  • 1 teaspoon vanilla extract
  • 1/4 cup sugar
  • 1 teaspoon ground cinnamon (or to taste)

Instructions

  1. Preheat oven to 425°F. Cover two baking sheets with parchment paper; set aside.
  2. In a medium saucepan, stir together 1 cup water, brown sugar and salt. Add butter and place over medium-high heat. Heat until butter is melted and mixture starts to boil. Remove from heat and add flour, stirring with a wooden spoon. Mixture will clump and pull away from the sides of the pan. Mix/mash with wooden spoon until no streaks of flour can be seen.
  3. In a small bowl, combine eggs and vanilla. Scramble mixture with a fork and then add to the dough-ball in the saucepan. Stir and mash, breaking up the dough until loosened. Stir well until eggs are incorporated and mixture has the appearance of mashed potatoes.
  4. Transfer dough to a piping bag fitted with Wilton star tip #M1. You could also pipe the dough in a zip-top bag with the corner snipped, but the churros will be ridge-less (delicious, nonetheless).
  5. Pipe dough into long thin lengths on the parchment covered pans. Use a pair of kitchen scissors to cut the end of the dough from the piping tip. Leave about 2-inches of space between the churros.
  6. Bake for 10-12 minutes or until slightly puffed. Turn oven to broiler setting and watch carefully as churros toast and turn deep golden brown. Remove from oven and let cool slightly. Transfer to a wire cooling rack. If you’re baking the churros one pan at a time, be sure to return the oven setting to 425°F before putting in the next pan.
  7. Combine sugar and cinnamon and pour onto a long dish. Roll churros in mixture. Serve.

Goat Cheese Polenta with Turkey & Vegetable Ragout

Goat Cheese Polenta with Turkey & Veggie Ragu

This dish is pure comfort food if you ask me. It’s hearty enough for a cold winter’s night, but still light enough to be a great transitional meal when spring hasn’t quite decided if it wants to be hot or cold yet. The meat and vegetables make it both filling and nutritious. You will get a lot of leftovers out of this recipes, which is a plus in my book. I also thought that the ragout tasted even better then next day.

Polenta is not everyone’s favorite food, but I happen to really like it. I think it makes a great base for a meal and keeps amazingly well for leftovers. You can top it with just about anything. I really like making my polenta with added goat cheese. It gives it both a creamy and tangy bite that I think goes really well with tomato based sauces.

Goat Cheese Polenta with Turkey & Vegetable Ragout
Adapted from Better Homes & Gardens.

For the Turkey Ragout:
  • 1 1/4 pound extra-lean ground turkey
  • 1 Tablespoon olive oil
  • 1 (14 1/2) ounce can diced tomatoes, undrained
  • 3 medium carrots, cut into 1/2-inch-thick slices
  • 2 medium onions, cut into thin wedges
  • 1 large red sweet pepper, cut into 1-inch pieces
  • 1/4 cup kalamata olives, sliced
  • 1/2 cup low sodium vegetable or chicken broth
  • 1/4 teaspoon salt
  • 1/4 teaspoon freshly ground black pepper
  • 6 cloves garlic, minced
  • 1 medium zucchini, halved lengthwise and cut into 1/4-inch-thick slices

For the Polenta:

  • 1 cup quick-cooking/instant polenta
  • 4 ounces soft goat cheese, slightly crumbled
  • 1 Tablespoon unsalted butter
  • Salt and freshly ground pepper, to taste
For Serving (optional):
  • Pesto
  • Fresh basil, chopped
  • Freshly grated parmesan cheese

Instructions:

  1. In a large skillet, cook ground beef until brown. Drain off any extra fat.
  2. In the same skillet, heat olive oil. When heated add onions and bell pepper. Cook about 5 minutes until starting to soften. Add in carrots, zucchini and garlic, along with undrained tomatoes, broth and salt and pepper.
  3. Cover and cook on low-heat until all the vegetables are cooked through and tomato and broth have slightly thickened.
  4. Meanwhile, prepare polenta according to package directions. I recommend using low-sodium vegetable broth for extra flavor. When polenta is almost cooked through, stir in goat cheese and butter.
  5. Spoon polenta into individual serving bowls and top with ragout mixture over polenta. Top individual bowls with pesto and garnish with basil and freshly ground pepper.


Haloumi Salad with Caramelised Onion Dressing

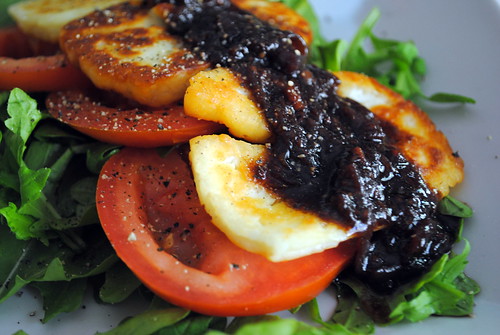
haloumi salad with caramelised onion dressing

Oh, haloumi, how I love you! Let me count the ways!  I really, really love haloumi. I also really, really love caramelized onions and tomatoes and arugula. I basically just really, really love this salad. There is something about the salty (and squeaky) haloumi and the kind of sweet, kind of not caramelized onion dressing that just makes for the most amazing flavor combination. The peppery arugula was also a flavorful addition that worked really well with the rest of the ingredients.

I’m not going to lie, making the dressing is going to take you a bit of time. To get really delicious, rich, sweet caramelized onions, you are going to need about an hour. Don’t believe anyone that says it will only 10 to 20 minutes, that’s a lie. And don’t believe anyone that says you can add sugar to caramelize them, that’s just gross. (I am very passionate when it comes to caramelized onions and these two points, if you couldn’t tell….) The onions will get naturally sweet and it is definitely worth the effort, you just need to give them time. You can definitely blend the onion dressing in a food processor if you prefer a more vinaigrette-like dressing. I left the onions un-blended (more like a chutney almost) because I felt it would make for a heartier salad.

haloumi salad with caramelised onion dressing

Haloumi Salad with Caramelised Onion Dressing


Ingredients

For the Salad:
  • 1/2 Tablespoon olive oil
  • 1 block of halloumi, sliced
  • 1 tomato, sliced
  • 1 bag of salad greens (I used arugula)
  • salt and freshly ground pepper, to taste
For the Dressing:
  • 1 Tablespoon olive oil
  • 1 large onion, thinly sliced
  • Kosher salt
  • 1 Tablespoon Dijon mustard
  • 3 Tablespoons balsamic vinegar
  • 1 pinch red pepper flakes
  • Freshly ground pepper, to taste

Instructions

For the Dressing:
  1. Heat oil in large pan over medium-high heat. Add onions when oil begins to shimmer. Let onions sit for 10 minutes and sprinkle with salt. Reduce heat low and continue to stir onions every 10 minutes until they are a rich, caramelized brown. It’s going to take about 1 hour, give or take 10-20 minutes either side.
  2. When onions are caramelized place in bowl and add the rest of the ingredients. Adjust flavors and spice to your taste. If you prefer a smoother dressing this can be done in a food processor.
For the Salad:
  1. Wash and prepare lettuce and tomatoes. Divide between two plates
  2. Heat oil in pan over medium-high heat (you can reuse the same pan you caramelized your onions in). Once oil is hot add haloumi slices and cook until starting to brown, about 2-3 minutes, then flip the haloumi and repeat on the other side.
  3. Top tomatoes with halloumi, then add the onion dressing and freshly ground pepper.
  4. Serve and enjoy!

Gluten-Free Cranberry Bread

Gluten-Free Cranberry Bread

I found a sad little bag of leftover frozen cranberries in my freezer the other day. I always freeze cranberries in the fall with the best intentions of using them sometime soon, but they always seem to end up hidden under everything else. I felt bad for these cranberries and wanted them to feel loved, so I baked them into a delicious bread. If baked goods don’t say “love,” I don’t know what does…

This recipe is pretty perfect. It’s fast, simple and delicious. I found the batter to be quite thick and it kind of smothered all my cranberries to the bottom of the baking pan. I will admit I got a little sick of the time it was taking to chop each individual cranberry in half, so I kind of just started hacking them up. Bigger pieces probably would have helped with more uniform berry dispersion. Every slice did have a lot of berries, they were just clumped on the bottom, which is not the worst thing. Next time, I might try substituting some of the milk for orange juice and adding some zest to make a delicious orange cranberry bread.

Gluten-Free Cranberry Bread
Recipe from Gluten Free on a Shoestring.

  • 8 tablespoons unsalted butter, at room temperature
  • 1 cup granulated sugar, plus 1 tablespoon
  • 3 eggs at room temperature
  • 2 1/2 cups all-purpose gluten-free flour (I used Better Batter)
  • 1 teaspoon baking powder
  • 1/2 teaspoon baking soda
  • 3/4 teaspoon kosher salt
  • 10 ounces fresh cranberries, halved
  • 2/3 cup milk, at room temperature
  • 1/4 cup sour cream or plain Greek yogurt, at room temperature
  • Coarse/Raw sugar (like Sugar in the Raw), for sprinkling

Instructions

  1. Preheat your oven to 350°F. Grease well a standard (9-inches x 5-inches or slightly smaller) loaf pan and set it aside.
  2. Beat the butter in a large bowl on medium-high speed until light and fluffy. Add the 1 cup of granulated sugar and the eggs, beating well after each addition.
  3. In a separate, medium-size bowl, place the flour, baking powder, baking soda and salt, and whisk to combine well. Place the cranberry halves in a separate, small bowl, and add a tablespoon of the dry ingredients to the cranberries, along with the remaining tablespoon of granulated sugar, and toss to coat. Set the cranberries aside.
  4. To the large bowl with the butter and sugar mixture, add the dry ingredients, alternating with the milk and sour cream, alternating between the two and beginning and ending with the dry ingredients. The mixture will be thick but smooth. Add the cranberries and reserved sugar and dry ingredients, and mix gently into the batter until evenly distributed throughout.
  5. Scrape the batter into the prepared pan, and smooth the top. It will fill or nearly fill the pan. Sprinkle the top lightly with coarse sugar. Place the pan in the center of the preheated oven and bake, rotating once, until golden brown on top and a toothpick inserted in the center comes out clean (about 1 hour). Remove from the oven and allow to cool in the pan for 20 minutes before transferring to a wire rack to cool completely. Slice thickly and serve.


Gluten-Free Reuben Salad

Reuben Salad

Well, I am off on a trip today and I’m quite excited about it. Most might associate the Reuben Sandwich with New York City, but according to the internet, the Reuben originated in the wonderful city of Omaha, Nebraska, which is where I am off to! One of my best friends moved to Omaha last year and since I am always up for an adventure, I decided Nebraska would be the perfect spot for my spring break!

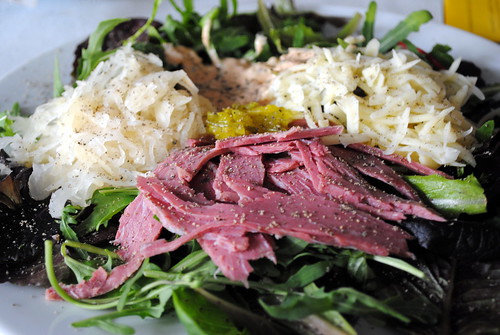
One of my favorite things about traveling, is trying the local cuisine and specialties. I am fairly certain I have never actually had a Reuben sandwich and since Rye bread is not gluten-free, I probably never will, but luckily you won’t even miss the bread in this salad. I was actually kind of surprised by how well this salad turned out. I was a bit wary of adding sauerkraut to a salad, but in the end I think it was my favorite part. I made my own Russian dressing as well and while it was very tasty, on its own it turned out a bit sweet for my taste. With the salad however, it did go quite well with the sauerkraut and pickles. Due to my prolong stint living in Eastern Europe, I have to absolutely love anything pickled and dill pickles and sauerkraut are two of my favorite foods. If you aren’t so big on those, this might not be the salad for you, but if you love a good Reuben sandwich this will be right up your alley.

Reuben Salad

Gluten-Free Reuben Salad
Dressing adapted from Martha Stewart

Ingredients

For the Russian Dressing
  • 1/2 cup mayonnaise or Greek yogurt (I used half and half)
  • 2 tablespoons ketchup
  • 2 tablespoons pickle relish
  • 2 tablespoons fresh lemon juice
  • 1 teaspoon Worcestershire sauce
  • 1/4 teaspoon garlic powder
  • 1/4 teaspoon smoked paprika
  • 1/2 teaspoon coarse salt
  • 1/4 teaspoon freshly ground pepper
For the Salad
  • 4 large handfuls lettuce or spring greens
  • 2 Tablespoons grated cheddar cheese
  • 1/4 cup sauerkraut
  • 1 Tablespoon dill pickle relish (or chopped dill pickles)
  • 2 Tablespoons Russian Dressing
  • 3 ounces cooked corned beef chopped or shredded (leftover or deli meat will work)

Instructions

For the Dressing:
  1. Combine all of the ingredients in a small bowl and mix well. Set aside or refrigerate until needed. Dressing can be covered and refrigerated for up to 1 week.
For the Salad:
  1. Add lettuce to a large serving bowl or plate. Top with the rest of the ingredients. Serve and enjoy!


Super Simple Gluten-Free Chocolate Cake

Gluten Free Chocolate Cake

This is by far the easiest gluten-free dessert I’ve ever made! Almost easier than opening a prepackaged mix. You only need two dishes to make this; a mixing bowl and a baking pan and you are ready to go. Start to finish, your cake will be ready in under 45 minutes!

I tried to cut down on the sugar since 1 cup seemed like a lot. I started adding it 1/4 cup at a time. I’m not sure if it was the cocoa powder or the gluten-free flour, but found that I definitely needed the whole cup. This cake is extremely rich and chocolatey. I ended up freezing about three-quarters of the loaf (I made mine in a loaf pan, not a cake pan). The slice I’ve defrosted since was just as good as the freshly baked. I think making this recipe into cupcakes, might make freezing a bit easier.

Gluten Free Chocolate Cake


Super Simple Gluten-Free Chocolate Cake
From Food.com via FitSugar.

  • 1 1/2 cups gluten-free flour mix (I used Better Batter.)
  • 1/2 cup cocoa
  • 1 cup sugar
  • 1/2 teaspoon salt
  • 2 teaspoons baking soda
  • 3/4 teaspoon guar gum or 3/4 teaspoon xanthan gum (only not included in GF flour mix)
  • 1/2 cup semi-sweet chocolate chips
  • 5 Tablespoons cooking oil
  • 1 Tablespoon vinegar
  • 1 teaspoon pure vanilla extract
  • 1 egg
  • 1 cup water
  1. Heat oven to 350°F
  2. Mix all dry ingredients in a bowl.
  3. Add all liquid ingredients and mix well.
  4. Bake in greased and floured nine-inch square pan (or lined with waxed paper) for 30 to 35 minutes, or until a toothpick inserted comes out clean.
  5. Serve as is or with some berries and cream for extra indulgence.