Gluten Free Blueberry-Lemon Ricotta Cheesecake Bars

Gluten Free Blueberry-Lemon Ricotta Cheesecake Bars

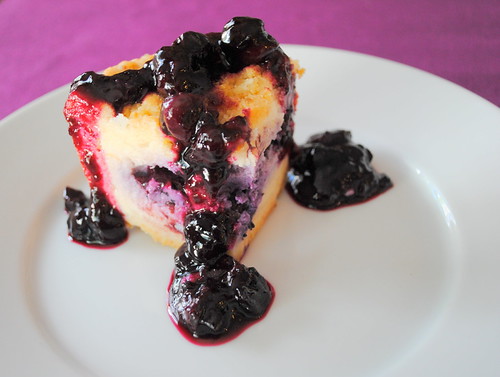
Cheesecake is one of the few desserts I actually go out of my way for. I kind of really love cheesecake. And this cheesecake is delicious. Using ricotta instead of traditional cream cheese really makes the cheesecake seem both rich and creamy, but without the heaviness cheesecakes normally have. I also think that the blueberry and lemon flavors really help keep the cheesecake feeling light and summery almost. I think a fruit centered cheesecake is much more appealing in the summer than something super rich and chocolatey.

Definitely make sure you let these cool overnight! You cannot skimp on the cooling time with these ones. But trust me, it’s totally worth the wait. The blueberry and lemon flavors really, really develop and get nice and friendly together the longer they And since this cheesecake is cut up into bars, it makes a great dessert for picnics, barbecues or when you need a portable dessert (obviously leave the blueberry sauce off to keep it clean and portable!).

Gluten Free Blueberry-Lemon Ricotta Cheesecake Bars
Recipe from Our Best Bites.

Ingredients

Crust and Topping Layers
  • 1/2 cup sugar
  • 1 1/2 cups flour
  • 1/4 teaspoon salt
  • 1/4 teaspoon baking powder
  • 1/2 cup (1 stick) butter, very cold
  • 1 large egg, separated
  • 1 Tablespoon lemon zest
Cheesecake Layer
  • 15 ounce container ricotta
  • 1/2 cup sugar
  • 3 tablespoons flour
  • 1 1/2 teaspoons vanilla extract
  • 2 eggs, plus one egg white
  • 4 tablespoons fresh lemon juice
  • ¾ cup frozen blueberries

Quick Blueberry Sauce

  • 1 ¼ cups frozen blueberries
  • 1 tablespoon lemon juice
  • 1 tablespoon water
  • 3 tablespoons sugar

Instructions

  1. Preheat oven to 350 degrees. Spray an 8×8 baking dish with nonstick spray and set aside.
  2. To prepare crust and topping, combine sugar, flour, salt, and baking powder in a medium sized mixing bowl and stir to combine. Use a large-hole cheese grater to grate butter into flour mixture, or alternately cut butter into small chunks and add to flour mixture. Use clean hands to break up butter and flour mixture until it resembles large crumbs. Add egg yolk from separated egg (reserve egg white for the next step) and add to crumb mixture. Quickly toss to incorporate egg yolk into crumbs. Remove half of crumb mixture (about 1 ½ cups) and lightly press into the bottom of prepared baking dish. Bake for 10 minutes and then remove from oven. Add lemon zest to the remaining crumb mixture, stir to combine, and set aside.
  3. To prepare filling, place ricotta and sugar in a food processor and process until smooth and creamy (about 1-2 minutes), scraping down sides as necessary. Place mixture in a mixing bowl and stir in flour, vanilla, eggs, plus the reserved egg white from the first step, and lemon juice. Whisk to combine and pour mixture over crust in pan. Sprinkle ¾ cup blueberries over the top of filling and then top with the reserved crumb mixture. Bake for 40-50 minutes. Bars should be just golden on top and slightly jiggly in center when shaken. Remove and let cool completely. Cover, and Place in fridge overnight to chill. When ready to serve, slice into bars.
  4. For Sauce: Combine all ingredients. Bring to a simmer and cook for 3-5 minutes, smashing berries with a fork. Cool. Sauce will thicken once cooled and chilled, adjust consistency by adding water until desired consistency is reached.
 

Spicy Chocolate Dipped Pineapple

Spicy Chocolate Dipped Pineapple

Fresh pineapple is probably my favorite fruit. I always think raspberries are, but then I have fresh pineapple and raspberries just can’t even compete. Plus fresh-cut pineapple smells amazing and doesn’t leave any annoying seeds in your teeth. The one and only time I was in Hawaii (for a grand total of 36 hours), I managed to consume pineapple at every meal and what a delicious 36 hours it was. Apart from my mild obsession with pineapple I was fairly certain I was going to love this recipe since I also like spicy things and really like the combination of sweet/spicy/salty. I found this recipe ages ago and I have wanted to try for forever, but only got around to it recently. I should have made it sooner. Sweet, salty, tangy, spicy, this super easy recipe had just about every flavor profile you could imagine.

Word to the wise, do not scoff at the 1/8 teaspoon of cayenne pepper. I did at first, and was quite tempted to add more to my chocolate, but that would have been at huge mistake. The heat is subtle at first and it grows. Wait until you are popping your third or fourth piece of pineapple and you will see what I mean.

I think an easy variation on this recipe would be substituting chipotle and smoked sea salt (Maldon also makes a smoked version of its sea salt). I think the smoky, spiciness would be amazing with the pineapple and chocolate.

Spicy Chocolate Dipped Pineapple
Recipe from Whole Foods.

  • 1/2 pineapple, peeled, cored and cut into 24 chunks
  • 2 (3.5-ounce) bars dark chocolate
  • 1/8 teaspoon cayenne
  • flaky sea salt (like Maldon)
  1. Thread a short skewer (4 or 6 inches) through each pineapple chunk and arrange on a large, parchment-paper-lined baking sheet. Working over a double boiler, heat chocolate, stirring constantly, until just melted; stir in cayenne. Working with one skewer at a time, pat pineapple dry with a paper towel, and then dip in chocolate, covering about halfway. Transfer to baking sheet, sprinkle lightly with salt and repeat with remaining pineapple and chocolate. Chill until set, about 45 minutes.


Gluten-Free Cranberry Bread

Gluten-Free Cranberry Bread

I found a sad little bag of leftover frozen cranberries in my freezer the other day. I always freeze cranberries in the fall with the best intentions of using them sometime soon, but they always seem to end up hidden under everything else. I felt bad for these cranberries and wanted them to feel loved, so I baked them into a delicious bread. If baked goods don’t say “love,” I don’t know what does…

This recipe is pretty perfect. It’s fast, simple and delicious. I found the batter to be quite thick and it kind of smothered all my cranberries to the bottom of the baking pan. I will admit I got a little sick of the time it was taking to chop each individual cranberry in half, so I kind of just started hacking them up. Bigger pieces probably would have helped with more uniform berry dispersion. Every slice did have a lot of berries, they were just clumped on the bottom, which is not the worst thing. Next time, I might try substituting some of the milk for orange juice and adding some zest to make a delicious orange cranberry bread.

Gluten-Free Cranberry Bread
Recipe from Gluten Free on a Shoestring.

  • 8 tablespoons unsalted butter, at room temperature
  • 1 cup granulated sugar, plus 1 tablespoon
  • 3 eggs at room temperature
  • 2 1/2 cups all-purpose gluten-free flour (I used Better Batter)
  • 1 teaspoon baking powder
  • 1/2 teaspoon baking soda
  • 3/4 teaspoon kosher salt
  • 10 ounces fresh cranberries, halved
  • 2/3 cup milk, at room temperature
  • 1/4 cup sour cream or plain Greek yogurt, at room temperature
  • Coarse/Raw sugar (like Sugar in the Raw), for sprinkling

Instructions

  1. Preheat your oven to 350°F. Grease well a standard (9-inches x 5-inches or slightly smaller) loaf pan and set it aside.
  2. Beat the butter in a large bowl on medium-high speed until light and fluffy. Add the 1 cup of granulated sugar and the eggs, beating well after each addition.
  3. In a separate, medium-size bowl, place the flour, baking powder, baking soda and salt, and whisk to combine well. Place the cranberry halves in a separate, small bowl, and add a tablespoon of the dry ingredients to the cranberries, along with the remaining tablespoon of granulated sugar, and toss to coat. Set the cranberries aside.
  4. To the large bowl with the butter and sugar mixture, add the dry ingredients, alternating with the milk and sour cream, alternating between the two and beginning and ending with the dry ingredients. The mixture will be thick but smooth. Add the cranberries and reserved sugar and dry ingredients, and mix gently into the batter until evenly distributed throughout.
  5. Scrape the batter into the prepared pan, and smooth the top. It will fill or nearly fill the pan. Sprinkle the top lightly with coarse sugar. Place the pan in the center of the preheated oven and bake, rotating once, until golden brown on top and a toothpick inserted in the center comes out clean (about 1 hour). Remove from the oven and allow to cool in the pan for 20 minutes before transferring to a wire rack to cool completely. Slice thickly and serve.


Summer Fruit Pavlova

Summer Fruit Pavlova

I have to say successfully making this Pavlova was one of my finest moments in the kitchen. I remember thinking Pavlova was the fanciest dessert ever when I was growing up. But for as long as I can remember, the thought of making meringue has scared me. There are too many variables in meringue making and the fact that something can go wrong at any point in the process just stresses me out. I spent quite a bit of time reading old cookbooks and consulting the websites of chefs I trust for learning something new. The end result was a smashing success. I was so proud!

Summer Fruit Pavlova

I made this a bit earlier in the summer for my wonderful mother’s birthday, so depending on where you are peaches and cherries might not be at the peak. As far as  fruit selection goes, you can’t really go wrong. Personally, I would stick to berries and stone fruits, but there are endless combinations that would be delicious.

Summer Fruit Pavlova


Summer Fruit Pavlova

Ingredients

For the Pavlova
  • 4 extra-large egg whites, at room temperature
  • Pinch kosher salt
  • 1 cup sugar
  • 2 teaspoons cornstarch
  • 1 teaspoon white wine or distilled white vinegar
  • 1/2 teaspoon pure vanilla extract
For the Whipped Cream
  • 1 cup heavy whipping cream
  • 1 tablespoon granulated white sugar
  • 1 teaspoon pure vanilla extract
For the Fruit Topping
  • 2-3 cups of mixed berries or fruits of choice.

Instructions

For the Pavlova
  1. Preheat oven to 250°F (130°C) and place rack in center of oven. Line a baking sheet with parchment paper and draw a 7 inch (18 cm) circle on the paper.
  2. Pour the vanilla and vinegar into a small cup. Stir the cornstarch into the sugar in a small bowl.
  3. In a large bowl of a heavy-duty mixer, fitted with whisk attachment, whip egg whites and salt, starting on low, increasing incrementally to medium speed until soft peaks/trails start to become visible, and the egg white bubbles are very small and uniform, approximately 2 to 3 minutes.
  4. Increase speed to medium-high, slowly and gradually sprinkling in the sugar-cornstarch mixture. A few minutes after these dry ingredients are added, slowly pour in the vanilla and vinegar (if you didn’t use cream of tartar.) Increase speed a bit and whip until meringue is glossy, and stiff peaks form when the whisk is lifted, 4 to 5 minutes.
  5. Gently spread the meringue inside the circle drawn on the parchment paper, smoothing the edges, making sure the edges of the meringue are slightly higher than the center. (You want a slight well in the center of the meringue to place the whipped cream and fruit.)
  6. Bake for 1 hour 15 minutes or until the outside is dry and takes on a very pale cream color. Check on meringues at least once during the baking time. If they appear to be taking on color or cracking, reduce temperature 25 degrees, and turn pan around. Turn the oven off, leave the door slightly ajar, and let the meringue cool completely in the oven. (The outside of the meringue will feel firm to the touch, if gently pressed, but as it cools you will get a little cracking and you will see that the inside is soft and marshmallowy.)
For the Whipped Cream
  1. Whip the cream in the clean bowl of an electric mixer fitted with a whisk attachment. When it starts to thicken, add the sugar gradually and then the vanilla, beating the cream until firm. Be careful not to over-do it, or might end up with a bowl of sweet homemade butter.
Assembling
  1. Invert the meringue disk onto a plate and spread the top completely with sweetened whipped cream. Spoon the fruit carefully into the middle of the Pavlova, leaving a border of cream and meringue.

Homemade Frosty Paws (aka Doggie Ice Cream)

Homemade Frosty Paws!

So, I am meant to be galavanting around San Francisco at the moment, but I thought that getting strep throat and an ear infection sounded like a much better use of my time. I was put on antibiotics and instructed not to fly by my favorite Urgent Care doctor, so I am still home, suffering through coughing fits, runny noses and disgustingly hot weather. There is a small silver lining to being stuck at home; I get to celebrate my darling pups’ 12th birthday!

It is extremely hot and humid here at the moment. Heat is fairly normal for this time of year, but humidity is not. As much as I love my dogs, there was no chance I was turning on the oven to bake them pup cakes. Since I was suffering through the heat, I knew that the poor dogs were too, ice cream seemed like the perfect birthday treat. I have purchased Frosty Paws from one of the local fancy pants grocery stores in the past, but now I’m older, wiser, poorer, so making my own was the only way to go.

I will admit, I did sample the recipe before I put the treats in the freezer and the mix was fairly delicious. Another reason I like these homemade treats compared to store-bought, no strange ingredients or preservatives. I used Greek yogurt, local honey, bananas, and all natural (no salt or sugar added) peanut butter. If I liked bananas, I could definitely imagine eating this for breakfast.

And most importantly, these frozen treats get two paws up and some very excited tail wags from the birthday girls. I attempted to get these two brats to take a picture together, but it proved futile. I think they caught on to the fact that the less they cooperated, the more ice cream they would get in an attempt to bribe them. These two are now both old and wise; 12 should be a doozy of a year.

Homemade Frosty Paws!

Homemade Frosty Paws!

Homemade Frosty Paws (aka Doggie Ice Cream)

  • 32 ounces plain Greek yogurt
  • 1 banana, ripe, mashed
  • 2 Tablespoons all-natural peanut butter
  • 2 Tablespoons honey
  1. Blend all ingredients together in a food processor. Freeze in ice cube trays (highly recommend silicone/soft trays).
  2. When frozen solid, remove from ice cube trays and transfer to freezer storage bags and store in freezer.

Gluten-Free Cream Cheese Coffee Cake

Gluten-Free Cheese-Filled Coffee Cake

I’m really not one for cakes (cheesecake is the one exception, but that’s totally different). But I have to admit, every once in a blue moon there is nothing better than a huge cup of coffee and a slice of coffee cake. I absolutely loved this recipe. I actually only made it because I had all the ingredients on hand, but it was so simple and quick to get together. Perfect for a quick breakfast sweet or an easy last-minute tea/coffee date.

I have to say that this coffee cake is definitely at its best straight from the oven. Despite wrapping  the cake up nice and tight, the next day it was close to rock solid the next day. That’s just the way gluten-free flours tend to be. A quick 10, 15 seconds in the microwave and the problem was solved.

Gluten-Free Cheese-Filled Coffee Cake

Gluten-Free Cream Cheese Coffee Cake
Recipe from Celiac Central.

Ingredients

For the Cream Cheese Filling:
  • 8 ounces cream cheese – room temperature
  • ¼ cup granulated sugar
  • ½ teaspoon lemon juice
For the Cake:
  • 1 ½ cups Gluten-Free Bisquick
  • 2 large eggs
  • 1/3 cup milk
  • ¼ cup butter – softened
  • 1 teaspoon pure vanilla extract
  • 1/3 cup granulated sugar
For the Crumb Topping:
  • ¼ cup light brown sugar
  • ¼ cup softened butter – room temp
  • 1/3 cup all-purpose gluten-free flour blend (Bob’s Red Mill is fine.)

Instructions

  1. Preheat the oven to 375 degrees. Generously grease a round 9 in. cake pan and set it aside.
  2. Mix the cream cheese filling in a small bowl and set aside.
  3. In a large bowl, mix the butter, milk, eggs, vanilla and sugar. Gradually add the flour and mix until well combined.
  4. Spread about a little more than half of the batter in the bottom of the pan. Next put the cream cheese filling on top and try to spread around. (It may be difficult, but using the back of a tablespoon works well.)
  5. Lastly, put the remainder of the dough batter on top.
  6. In a small bowl, using a pastry blender tool or 2 forks, combine the topping ingredients until it resembles crumbs. Sprinkle over the batter in the pan.
  7. Bake for about 20-25 minutes (I would start checking it around 20). Insert a tooth pick into the cake and it should come out clean and dry when done.
  8. Cool well before dusting the top with sifted confectioner’s sugar, if you like. After cooling, be sure to keep covered for freshness.

Gluten-Free Salted Caramel Mocha Bundt Cakes

Gluten-Free Salted Caramel Mocha Bundt CakesSo I guess now that Thanksgiving has come and gone here in the States, I guess that means the holiday season is officially upon. I must admit I am a bit of Grinch. Mainly because I think christmas has just gotten far too out of hand. There is only one thing that I absolutely adore about the holiday season and that’s the obscene amount of baking that I can do. It’s the one time of the year that mass quantities of baking are socially acceptable.

I’ve already started thinking of fun and new recipes I can start testing out on my friends and family. It’s great having a willing and able built-in test audience, especially since I’m not too keen on sweets. I light of my mini dessert obsession this recipe seemed like the perfect combination of experiment and great taste. I really wanted to try out my new mini bundt pan (how fun is the word ‘bundt’?). I’m not sure if it was me, the recipe, the oven or the pan, but it was rough going when things came out of the oven. Luckily, after a bit of coaxing, everyone got their act together and cooperated in the end. The salted caramel flavor made this chocolate cake even richer. Add in the frosting and it was one of the sweetest and richest desserts I have ever come across. I decided to sprinkle on a bit of flakey sea salt to enhance the caramel flavor and cut the sweetness just a bit.

Gluten-Free Salted Caramel Mocha Bundt Cakes

Gluten-Free Salted Caramel Mocha Bundt Cakes

For the Cake

    • 2 cups Better Batter all-purpose gluten-free flour
    • ¾ cup unsweetened natural cocoa powder
    • 1¼ teaspoon baking soda
    • ¾ teaspoon kosher salt
    • 1½ cups packed light brown sugar
    • 1 stick unsalted butter, at room temperature
    • ½ cup sour cream, at room temperature
    • 2 extra-large eggs at room temperature, beaten
    • 1 teaspoon pure vanilla extract
    • 1 cups International Delight Salted Caramel Mocha Flavor
For Frosting
  • 1/2 cup powdered sugar, sifted
  • 2 Tablespoons International Delight Salted Caramel Mocha Flavor

For the Frosting

    1. Mix powdered sugar with International Delight. Beat with electric mixer on low. If the mixture is too thick for frosting, add in more International Delight. If it is too thin, add in more powdered sugar.
For the Cake
    1. Preheat your oven to 325 degrees F. Grease mini bundt pan or baking pan of choice.
    2. In a large bowl, place the flour, cocoa powder, baking soda, salt and brown sugar, and whisk to combine well. Add the butter, sour cream, eggs, vanilla and International Delight, and mix to combine well. The batter will be thickly pourable.
    3. Fill the wells of the pan. about halfway full with batter. Shake from side to side to distribute the batter in an even layer. Place in the center of the preheated oven, and bake until a toothpick inserted in the center comes out clean, about 20 minutes. The cake should be a little spongy, not dense.
    4. Remove the pan from the oven and allow to cool for at least 10 minutes in the pan. Transfer to a wire rack to cool completely.
    5. Place one mini cake on a piece of parchment paper, bottom side down. Drizzle a generous amount of frosting on top of the cake.

The International Delight Facebook page shares coupon savings and a chance to share your delight this holiday season.


This is a sponsored conversation written by me on behalf of International Delight. The opinions and text are all mine.

Baby Cheesecakes with Toffee Pears

Baby Cheesecakes with Toffee Pears

Earlier today I was discussing baked goods with my friend Zack (we don’t like them). This whole conversation came out of a discussion of birthday cakes (it’s my birthday today, we were just randomly discussing cakes). I like savory things much better. Personally I would be much happier if someone gave me a wheel of brie or blue cheese, stuck a candle in it and called it a day. There is one exception to my dessert rule and that would be cheesecake. I do like cheesecake.

This isn’t your typical cheesecake. There is blue cheese involved, which is initially why I wanted to make this. Combining my favorite cheese and my favorite dessert just seemed like a brilliant idea. I was slightly hesitant about the fact that there is no sugar added into the cheesecake. One of them fell apart when I was removing them from the muffin tin and I stole a bite and it was not a good idea. Luckily when I served them with the pears, it was a very enjoyable (and unusual) combination. I had enough crust for 14 cheesecakes, but only enough filling for 13. I would recommend only doing 12 as some of my came out a little thin on the cheesecake end of things. Luckily I like my cheesecake on the crustier side of things, so I wasn’t too bothered by that.

Baby Cheesecakes with Toffee Pears

Baby Cheese Cakes with Toffee Pears
Adapted from Better Homes & Gardens.

  • 3/4 cup quick-cooking rolled oats (I used Bob’s Red Mill Gluten Free Oats)
  • 1/4 cup finely chopped walnuts
  • 1/4 cup packed brown sugar
  • 3 Tablespoons butter, melted
  • 1-8 ounce package cream cheese, softened
  • 1 egg
  • 2 ounces crumbled blue cheese
  • 1/4 cup dairy sour cream
  • 2 tablespoons butter
  • 1/2 cup packed brown sugar
  • 2 tablespoons whipping cream
  • 4 pears, cored and sliced
  • 1/4 teaspoon vanilla
  • 1/2 cup lightly toasted broken walnuts
  1. Preheat oven to 375 degrees F. Line eight 2-1/2-inch muffin cups with foil or paper bake cups; set aside.
  2. For crust, in bowl stir together oats, 1/4 cup walnuts, 1/4 cup brown sugar, and 3 tablespoons butter until combined. Spoon 2 rounded tablespoons oat mixture into each prepared muffin cup. With bottom of a narrow glass press down lightly. Bake 8 minutes or until lightly browned. Cool slightly on wire racks. Reduce oven temperature to 325 degrees F.
  3. For cheesecake filling, in medium bowl beat cream cheese with an electric mixer on medium to high speed until smooth. Add egg and beat just until combined. Stir in blue cheese and sour cream.
  4. Spoon well-rounded tablespoons of the cheese mixture into each crust-lined muffin cup. Bake 20 minutes or until slightly puffed and set. Cool 30 minutes. Remove from cups. Place on tray, cover and refrigerate at least 2 or up to 24 hours. Let stand at room temperature for 30 minutes before serving.
  5. For Toffee Pears, in large skillet melt the 2 tablespoons butter over medium heat. Add the 1/2 cup brown sugar and cream. Cook and stir until bubbly. Add pears. Cook, stirring occasionally, 5 minutes or until pears are tender. Remove from heat. Stir in vanilla. Cool slightly.
  6. To serve, remove foil or paper liners from cheesecakes. Spoon about 1 tablespoon brown sugar-cream mixture into each of the dessert dishes. Top with a cheesecake. Spoon pears around cheesecake. Sprinkle each with toasted walnuts.

Balsamic Strawberry Popsicles

Balsamic Strawberry Popsicles

So this is what started my whole strawberry craze. My friend Amy (hi Amy!) posted on my Facebook about how delicious strawberries and balsamic are. True story. It’s a delicious combination. I remember making a strawberry balsamic dessert in high school and I felt super grown-up and sophisticated. That phase didn’t last long. Amy’s comment made me really crave some kind of strawberry balsamic combination, but I wanted to try something a little different.

These popsicles are super refreshing and so easy to make. I definitely plan on making these a lot over the summer. Next time though, I would change a few things. I would probably either cut back on the sugar or up the balsamic a bit.The strawberries were definitely sweet enough on their own and didn’t need a whole 1/4.  The vinegar flavor was there, but I would have preferred it to stand out a little more.  And the freshly ground pepper… I love pepper, but every now and again I would find myself biting into what I thought was a little strawberry chunk only to be (rudely) surprised by pepper. Definitely make sure your pepper is finely ground.

Balsamic Strawberry Popsicles (from Epicurious)

  • 2 cups sliced, hulled strawberries (from about 1 pound berries)
  • 1/4 cup sugar
  • 2 1/2 tablespoons good-quality balsamic vinegar
  • Freshly ground black pepper
  1. Place the strawberries and sugar in a food processor and pulse just until the mixture is finely chopped and juicy but still chunky; you don’t want a smooth purée. Transfer to a bowl and stir in the balsamic vinegar and a few grinds of pepper.
  2. Spoon the mixture into ice pop molds and insert sticks. Freeze until firm, at least 6 hours or up to 1 week.
  3. To unmold the pops, run hot water over the outsides of the molds for a few seconds, then gently pull the sticks.

Gluten Free Strawberry Nutella Muffins

Gluten Free Strawberry Nutella Muffins

There’s a man with a van who hangs out around the closest big intersection to my house. He sells things out of the back of his van. Primarily berries and cherries, but sometimes there are avocados and mangoes or pumpkins and pineapples; it kind of just depends on the season. I live about 40 minutes away from one of California’s biggest strawberry growing regions, so we pretty much get them year round. They are just starting to come into their main season at the moment. The berry man has become my go to source for strawberries and other various items, because 1. he’s cheap, 2. he has a hand painted sign that says ‘Picked Fresh Today’ and 3. they are always delicious, which makes me believe the sign and love the price even more. I drove by the berry man the other day and got the genius idea of buying a full flat of strawberries, which turned out to be able SIX pounds, which is sort of a lot. I felt pretty proud of myself getting 6 pounds of strawberries for just over $2 a pound, especially considering how expensive they are in the grocery store, but as soon as I got home, I realized I had to figure out what to do with six pounds of strawberries…

My first strawberry endeavor was this delicious muffin recipe. It’s perfect for a sweet breakfast treat and also makes a pretty satisfying dessert. Quite frankly, it’s pretty hard to go wrong with Nutella. The fresh strawberries only make the Nutella even more enjoyable. My favorite part of these muffins is the little Nutella line that runs through the center. It basically ensures you get a bit of Nutella in every bite!

Gluten Free Strawberry Nutella Muffins

Strawberry Nutella Muffins (adapted rom Prevention RD)

  • 1 1/2 cups gluten-free flour (I used Better Batter)
  • 1/2 teaspoon salt
  • 2 teaspoon baking powder
  • 1/3 cup sugar
  • 1/4 cup canola oil
  • 1 large egg
  • 1/3 cup low-fat buttermilk
  • 1 teaspoon vanilla extract
  • 1 cup chopped fresh strawberries
  • 1/3 cup Nutella
  1. Preheat oven to 350 degrees. Line a muffin tin with paper liners or grease well. Set aside.
  2. In a medium bowl, whisk together the flour, salt, baking powder, and sugar. In a separate bowl, whisk together canola oil, egg, buttermilk, and vanilla.
  3. Mix the wet ingredients into flour mixture. Add slowly and gently stir, you don’t want to over mix. The batter will be very thick; fold in the strawberries.
  4. Fill each muffin cup half way with batter. Next, add a small spoonful of Nutella to each muffin cup. Cover the Nutella filling with the remaining batter.
  5. Bake muffins for 22-26 minutes, or until muffins are golden brown and a toothpick comes out clean. Remove the muffins from the pan and let cool on a cooling rack. Yield: 12 muffins.